Subscribe Via Email

Like reading this blog? You can get the complete text of the latest articles at Within My Means in your email inbox each morning by entering your email address below, then verifying the subscription. Your address will only be used for mailing you the blog, and each one will include a link so you can unsubscribe at any time.

Enter your email address:

Delivered by FeedBurner

June 26, 2019

Watercolors Week One - Reflections


I made it to my first session of the Painting with Watercolors class offered through Burbank Parks & Rec at the Betsy Leuke Creative Arts Center classroom.  It's actually the second week of the course, but I missed the first session due to work.   A ten week summer session was $95, with an extra $10 fee because I'm not a Burbank resident. 

This class is close to my heart as I'm getting to use art supplies that belonged to my late uncle, Dick Rosentreter.  Dick was a museum curator at the Illinois State Museum and an artist by education. He passed away following an epileptic seizure in 1986 at the young age of thirty-eight.  My sister had his art supplies for many years before passing them on to me.  I organized them but never really used them for about fifteen years.  I have a large piece of his artwork hanging in my living room, over my couch, so I think of him daily.

The watercolor course taught by Pam McDonald is welcoming but structured. A demo and critique is given each week on class and/or individual paintings.   Each week will have a theme for the lesson.  In today's class we studied reflections.   A materials list was provided prior to the session; we brought our own paints, paper, and brushes. But the instructor had small magazine clippings that went with her theme which we could choose from as inspiration to paint. 


Above is the magazine clipping that I picked from the instructors selection's.  Actually, the teacher picked it for me when I asked her which one from the array would be easiest.  I wanted an entry level project as I had no prior experience.  See the little chips in the water?  I thought that the clipping was just so old it was flaked and degrading.  So when I painted it, I actually had the inspiration drawing upside down.  Thus my painting below looks like it is backward left-to-right.   

It was fun to mix colors from a basic palette to make shades of green/blue/yellow.  We were encouraged to work quickly and impressionistically, without paying too much attention to shape or detail.  The professor showed me how to make the lines in the reflection to show the movement of the water, and to underline them with a darker color for better effect.

I'm really not at all impressed with the work I did on this assignment but again I'm willing to share it in the hopes that I'll see improvement once I compare my last assignment at the end of the course.  I'm keeping in mind that this endeavor is for fun, learning, and relaxation this summer.  Can't wait to see what else I learn in the next eight weeks!

June 25, 2019

Hesby House Garden 2019 -- Irises and Dahlia


I have a brief update on the 2019 garden.  Since I lost all of my in-ground beds when the new owner took over the property about two years ago, I haven't talked much about gardening.  But I do have a few things in pots, and am pleased with what has survived.

It was painful to have to dig up everything I'd tended for years and give them away to friends.   My most special bulbs went to a friend that had just bought a house, in hopes that someday I can get starts back from her.  

I grew four kinds of tomatoes this year, planted mid-March, but the cold weather gave them a late start.  They're also in pots, and as predicted Sungold Cherry has been my most prolific producer.  I've gotten four or five Pineapples, and my the other two are just starting to fruit.  

My dahlia is nothing more than a stick in a pot for three quarters of the year.  ever winter I think it's dead, but leave it alone to give it one more shot, and in the spring lo and behold! a shoot pops up.  This year the flowers are only about two feet tall, but they are happy and seeking sun.


memorial flags for Caitie on left and Chance on right
I have two raised garden beds about three feet by two feet that are filled primarily with herbs.  Along the back corner are two kinds of container grapes that are promising but the California weather has been so uneven the past few years that they've managed to survive but not really thrive.  My herbs are lemon balm, sage, garlic chives, thyme, and sometimes rosemary.  The back half of the first bed is filled with a few irises.

My mint pot with a bird trellis

One of the irises from my old garden bloomed this spring right in front of the memorial flag to my beloved Chance.  It was him smiling at me, I'm sure. 


I bought three new irises from Armstrong Gardens this spring, and one bloomed immediately.  It's called "Apricot Silk."  I also located an Iris Society in the San Fernando Valley just in time to attend their spring sale.  So I have three new member-grown Irises that I hope will root this year and flower next spring. 

Bearded Iris "Apricot Silk"

June 24, 2019

Acrylics Week One


Having tried a basic drawing class at Barnsdall Art Barn, I'm ready to move on to more specific techniques.  I loved my instructor at Barnsdall, but he takes summers off of teaching to return to Europe.  

Since I'm still learning fairly universal and basic skills, I decided to look closer to home at Burbank Parks & Rec for summer classes, and chose two:  a Watercolor class, and a class in Painting with Acrylics.  Both are only ten minutes down the street from me at the Betsy Lueke Creative Arts Center classroom.  I missed the first watercolor class due to work, but was able to make it to the first session for the acrylics course.  The goal of the acrylics class is to "create paintings that explore your artistic vision and discover techniques with the help of a visionary artist with three decades of professional experience."  Our instructor, Johnathon Gallagher, was warm and welcoming to our first class, even making popcorn for the group.  The class is no more than 10-15 students, sitting in a u-shaped row of tables.  The materials list included a tabletop easel, canvas, and starter set of acrylic paints and brushes, some of which I already had.  The eight-week course was $88, with an extra $10 fee because I am not a Burbank resident (I live in the neighboring area of North Hollywood).


I made it to the first class, but was really burnt out from six straight days of work.  I didn't have an easel yet.  The materials list mentioned a canvas no bigger than 16x20.  Because I don't have much wall space in my apartment, I decided to start small, and just bought a package of four 8x10 canvases.  Most folks in class seem to be working on bigger projects.  


The Betsy Lueke Creative Arts Center building is a beautiful studio with professional showings of community work.  The classroom is an open space in the corner of the studio.  There's a small courtyard in back, and a separate smaller outbuilding housing the pottery studio.  The CAC is adjacent to a park, so there's a sizeable parking lot and greenspace out front.  It's a bright, cheery place to come to learn. 
  
I did have something in mind--it's time to do a portrait of Caitie, the pup I lost last September to a bee sting.  Since she was only five when she passed, I hadn't yet gotten a painting done of her.  And I'd love to match ones I have of Chance and Claire, done by a professional artist.  Those are 8x10 so that's who I bought the size of canvas that I chose.  

Anyway, I went to the first class expecting a bit of an introduction, lecture, inventory of what supplies were needed for what purpose.  Instead our instructor Johnathon works by allowing us to paint, and offering help only where needed.  It seemed most of the people in the room were continuing students that knew the plan.  I took some time to pick the photo that I wanted to work from, and tried to sketch it out with his help.  I didn't bring the printed out photo to sketch from, but was instead trying to draw from viewing the photo on my tiny phone.  That was the biggest mistake.  While I liked my first instincts, there were a few parts of my drawing I was unhappy with.  When I asked for advice, the instructor erased the parts I was most happy with, and drew his own version of the face that I didn't think showed her personality.  I felt the drawing was taken over and I wasn't happy with the results.  So I scrapped it in favor of sketching in the quiet of home.  

My goal with the homework assignment was to sketch out my portrait of Caitie so that I can start painting in class tomorrow.  A Sunday afternoon is a perfect time to sketch.  But I think my new pup Callie understood that I was sad, missing Caitie, as I studied her photo.  She stuck to me like glue, even sitting on my chest, making it difficult to draw.  So I took a break for some puppy snuggles, and finished a bit later.  I was glad I chose to sketch in daylight.  I'll feel good going into class tomorrow prepared. 

June 16, 2019

Pasadena Chalk Festival 2019


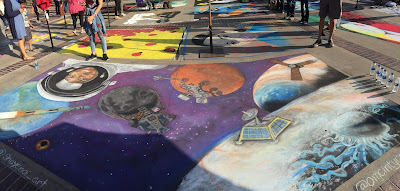
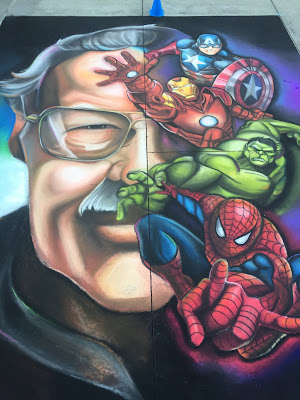
The Pasadena Chalk Festival didn't disappoint once again in 2019.  This annual fest held on Father's Day weekend each year at Paseo Colorado in Pasadena is so much fun to wander.  The artists work in front of the public.  The festival is judged and the public weighs in with text voting.  

Some of my favorites this year are the ones surrounding this text, as well as the tribute to Stan Lee, and a few dog themed pictures.   If you couldn't make it there, I thought you'd enjoy seeing my photos from the event.


June 14, 2019

Quinoa, Tomato, and Avocado Stuffed Enjoya Pepper with Everything Bagel Balsamic Roasted Brussels Sprout


Thanks to Melissa's Produce, I had an abundance to share with a friend last night.  I went over to cook dinner for my friend Molly and I at her apartment.  It's fun to make new things in an environment I wasn't familiar with.  And thanks to the fresh ingredients I was able to bring with me, the prep wasn't too extensive or messy. 


For a main course, I made a filling of Melissa's pre-cooked quinoa, which comes in a tube.  I simply fluffed the quinoa and added sliced baby heirloom tomatoes and diced avocado, with a bit of salad dressing vinaigrette.  I sliced off the top of two Enjoya peppers, then used a spoon to clean out the seeds.  The quinoa salad mixture went easily into the peppers, which were roasted at 450 degrees for about 20 minutes.  The idea was to soften the pepper without overcooking the prepared quinoa, hence the high heat. 


As a side, we had balsamic vinaigrette and everything bagel seasoning roasted Brussels sprouts.  After cutting off the ends of the Brussels sprouts, I first blanched them in boiling water for about a minute to reduce the bitterness of the sprouts.  The bright green color of the sprouts once blanched is amazing.  I then cut them in half lengthwise, and chiffonaded about three heads of shallots.  I tossed the sprouts and shallots in olive oil with a generous splash of balsamic vinegar and about two tablespoons of everything bagel seasoning.  Roasting the veggies at 450 for about 35 minutes, stirring once halfway through, turned them crispy and flavorful.  

The quality and freshness of Melissa's Produce products truly make my cooking the most flavorful meals I could ever serve.  Mindfully choosing the products I use in my home is my way of caring for my family and friends, as well as taking care of myself.  And by eating the freshest, I am willing to try foods normally out of my comfort zone, like Brussels sprouts (normally - ew, yuk!).  When I prepare the best, I eat more variety.  Look for Melissa's products in your local grocery store. 

June 11, 2019

Beginning Drawing Week Six/Last Class

My sketches from our instructor's practice sheets
Today was the last meeting of my Beginning Drawing class at Barnsdall Art Barn.  I missed the first class due to an Easter vacation, and I missed class last week as I was working as a poll clerk for the June election.  So in all I caught six classes of the eight week session.

The assignment for today's class was to bring a mirror or photo in order to draw a portrait.  Our instructor Rolandas had a packet of practice sheets and information about human anatomy drawing.  He also had a still life set up for those that didn't bring anything to draw. 

the still life setup

With a printed out photo of my mom to draw, I smudged the paper with charcoal dust.  After sketching the printed photo paper with guidelines to divide the face into quadrants, I sketched out the general shape of the face and laid in the shape of the eyes, mouth and hairline in pencil but then wasn't sure where to go, especially with the smudged paper, as we were then basically sketching in a negative, erasing rather than drawing.  Rolandas came over to assist, and ended up basically erasing most of what I'd done, then demonstrated how he would have approached a portraiture.  While I appreciated his technique, I felt I needed more time sketching before I was ready to approach an exact likeness.  So I went back to his handouts and spent the rest of the class practicing.

Instructor Rolandas' sketch

June 2, 2019

Indigo Dying Workshop


Summertime fun!  I felt like I was back at 4-H camp when I had the pleasure of taking a one day seminar on indigo dying at Barnsdall Art Park.  Our instructor sent us an email ahead of class with a link to her pinterest board for ideas on what to do with our fabric. There were fourteen people registered for the class, so we had a nice group to chat with as we worked.  We were advised to bring rubber gloves to wear and natural fiber fabrics to dye in class. 

Indigo is one of the oldest dyes used for coloring textiles and the one still used today to color denim jeans.  Indigo comes from a plant thorough a process of fermentation.  The dye that we used came in a kit, and the instructor had it pre-mixed to be ready for us.  This saved time as the dye has to sit for about an hour once mixed before being used.  The solution was made of dye powder, sodium carbonate, and sodium hydrosulfite.  The prepared dye is a yellow-green color.  When the fabric is removed from the dye vat it is initially this same color, but as the oxygen in the air reacts with the indigo, the color will turn blue.  As the indigo oxidizes it becomes trapped within the fibers, making the dye permanent. 


A trip to the thrift store yielded a white shirt with some cute ruffles for just $5.  Turns out to be a trendy brand, HandM.  When I bought it I couldn't find the tags stating material, but luckily it was an all natural cotton fabric that would take the dye. 


Our instructor had chopsticks, corks, marbles, small boards, yarn, rubber bands, and water bottles that we could use to tie or embellish the fabric before dying.The fabrics have to stay in the bath for about thirty minutes, and our class was only four hours long.  After an initial lecture/intro of about forty five minutes, we were left with limited time to creatively prep our items. 


I chose to focus on the ruffles of my shirt first.  I used small marbles on the top ruffle, and larger ones on the bottom, wrapping them with rubber bands.  It took longer than I would have thought to put so many details on the fabric!  I then focused on the sleeves, adding the same small marble circles there.  I wanted to do something fancier to the main front of the shirt but ran out of time.  Frankly, that's probably a good thing.  I would have muddled the design by overcomplicating it.  And the places where I put accents will draw attention to the right areas of my body, rather than adding somethign weird to my bustline. 


The instructor put our items in to the dye bath by slowly sliding them in along the side of the bucket, to avoid oxygenating the pool of dye.  After sitting in the covered bucket of dye for the required length of time, the items were wrung out carefully as they were removed from the bucket.  This is where I needed my gloves, as I had to use an envelope cutting tool to remove all the rubber bands holding the marbles.  It actually took quite a while to fully open the fabric!  Being exposed to the air for about twenty minutes allowed time for the oxidization to take place.  The instructor advised to lay the items out to fully dry at home, then to wash in a washing machine once or twice with rags to make sure all the extra dye is rinsed out.  After that, the item should be completely color safe and free to wash with any other items. 


I'll be wearing this shirt in just a few weeks on fourth of July!


I had time to quickly do a second project in the class.  One of the students was a theater kid who had brought a bolt of silk from his stock that he was kindly sharing.  I took a piece long enough to wrap around me.  I had very little time to prep this one, and wanted to try something different.  So I folded the material into a smallish square, about nine inches.  Then I used rubber bands to secure four sets of chopsticks around the square in a diamond shape.  I was hoping I could twist the center into a rosette, but found there wasn't enough slack to do so.  So I ended up utilizing a marble on each side of the fabric and left that for center texture. 


The finished silk fabric came out beautifully!  the inner layers were lighter blue than the layers closest to the outside of my "package."  I'll look forward to sewing this silk into a wrap or table runner soon.