Subscribe Via Email

Like reading this blog? You can get the complete text of the latest articles at Within My Means in your email inbox each morning by entering your email address below, then verifying the subscription. Your address will only be used for mailing you the blog, and each one will include a link so you can unsubscribe at any time.

Enter your email address:

Delivered by FeedBurner

July 17, 2013

Baby Ainsworth's Shower and a Spinach-Mushroom Casserole


I was lucky to attend a baby shower for a dear friend of mine, and have a few fun ideas to share!  I gifted a vintage knit afghan that I'd had dry cleaned to be ready for baby Elijah.  I'm hoping it will bring peace and comfort to mom and baby during many a long night.  Even though I didn't make it myself, I could see all the love that went into it and felt it should be passed on and loved again.  A little cleaning and basic spot treatment was all it needed!


This darling fruit bowl was trimmed for the event.  The "baby" orange had a pacifier in its mouth, with grapes for the eyes, nose, and ears.  The fruit was delicious!


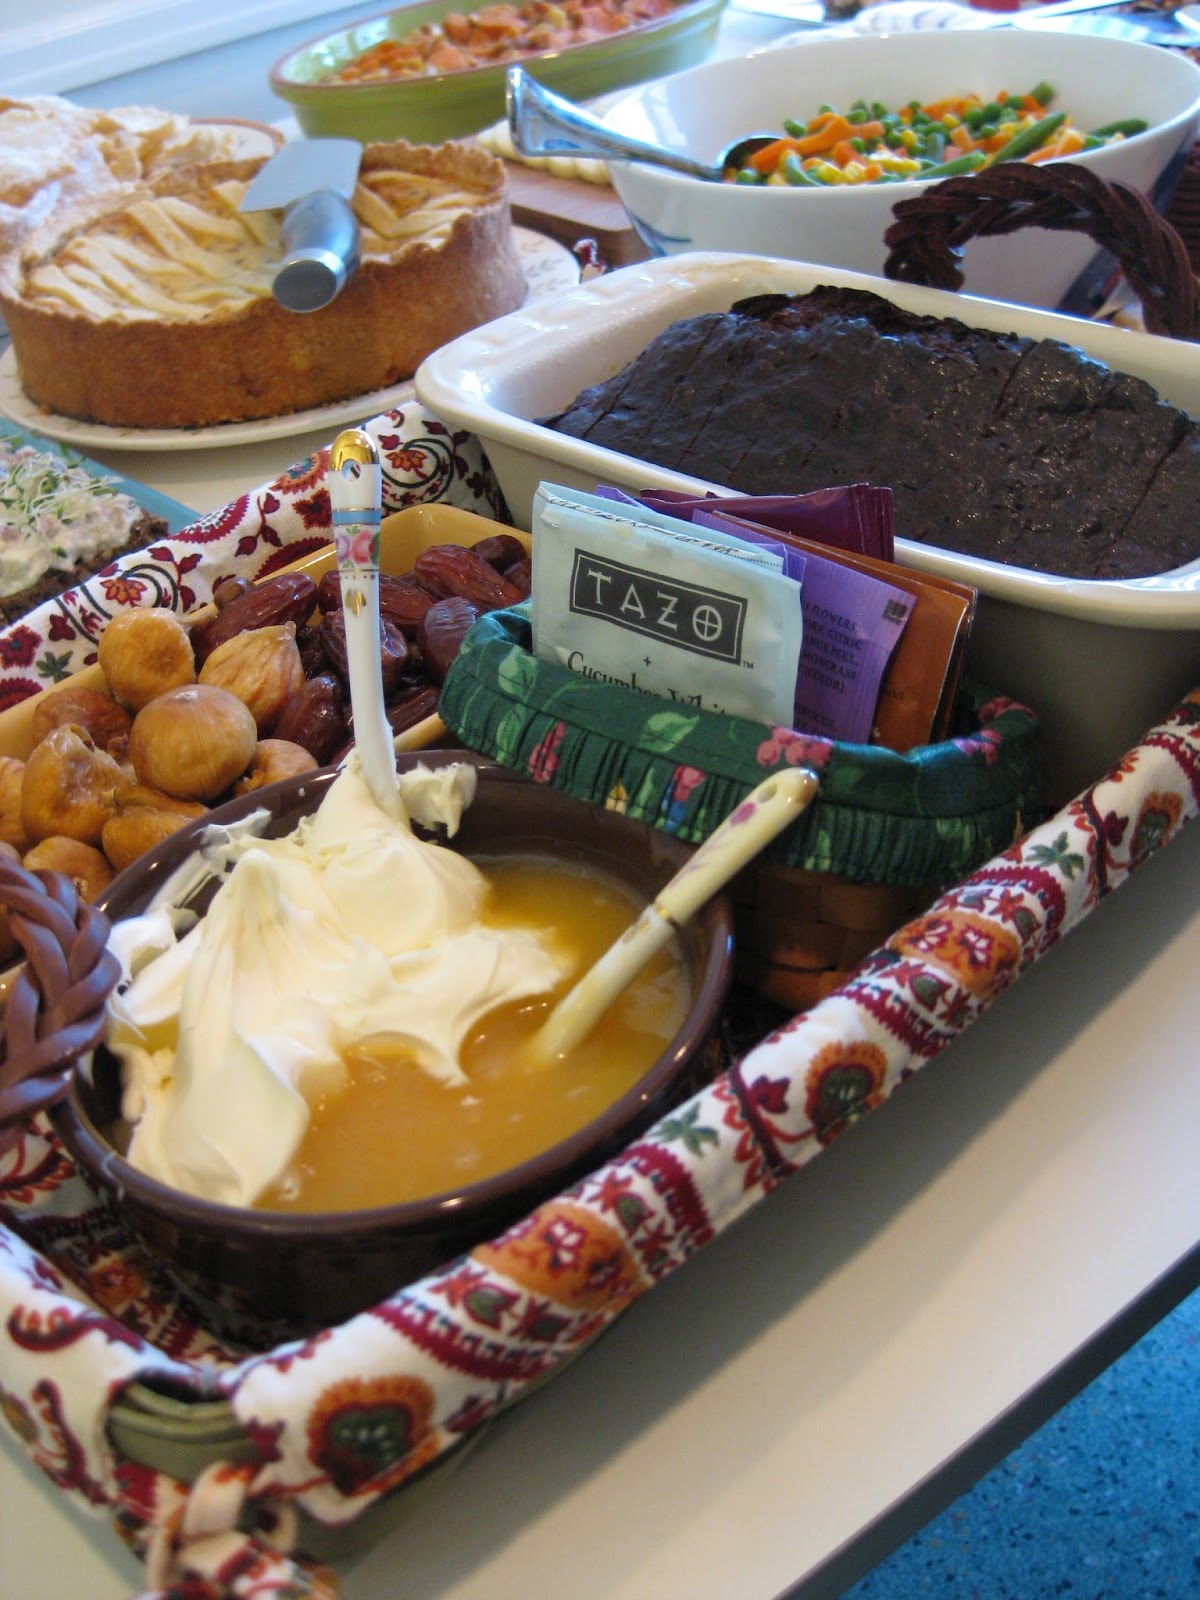
We had a lovely brunch of scones dotted with golden raisins and topped with marmelade, fresh fruit, and a couple different casseroles.  Of course I begged for the recipe for the vegetarian casserole, which featured spinach and mushrooms.  I couldn't get enough of the casserole or the mimosas!  And this was the perfect main dish for the event, as it can be made ahead, leaving the hostess free to enjoy the guests.

Make Ahead Spinach-Mushroom Breakfast Casserole

Ingredients:
3 cups seasoned croutons.  [our hostess used two 5 oz bags of Cheese & Garlic croutons]
6 eggs
2 cups milk
1 (10.75oz) can of condensed cream of mushroom soup
1 (10 oz) package frozen chopped spinach - thawed, drained and squeezed dry (or can sauté fresh spinach)
1 can (4.5oz) of mushrooms drained and chopped
1 cup shredded sharp Cheddar cheese
1 cup shredded Monterey Jack cheese
[You can also add a pound of meat - e.g., turkey sausage or bacon - our hostess didn't]

Directions:
1.  Spread croutons on bottom of greased 9 x 13 inch baking dish.  
[If you want to add meat, then cook it first and spread over croutons]
2. In a large bowl, whisk together eggs and milk until well blended.  Stir in soup, spinach, mushrooms and cheeses.  Pour egg mixture over croutons.  Refrigerate overnight.
3.  The next morning, preheat oven to 325 degrees F.
4. Bake in preheated oven for an hour to hour and 10 minutes or until set and lightly browned on top.

July 13, 2013

Summer Fruit with FBLA


We had everything from salads, to cheesecake, to savory crepes at the FBLA's July meeting, with the theme of "summer fruits."  The Sangria was a wonderful compliment to the lightness of our meal.  I had the opportunity to share a treasured family recipe at this meeting:  my grandma's Banana Salad.


The sauce for our Banana Salad is a simple one of sugar and mayo.  It has a sweet tanginess close to caramel.  Added to bananas and nuts, and you have my favorite dish!  We serve this at every family reunion (goes without saying) and on every holiday table.  Amongst my most common requests (along with cheese souffle) whenever my mom cooks for me, in my immediate family this will forever be known as "Bana Salad," the title my sister wrote when she transcribed the recipe from my grandma at about nine years old.  While the sauce can easily be made ahead and stored in the refrigerator, this salad is best made fresh before eating.  The bananas do not keep well, especially once sauced.  Of course, I've never known there to be leftovers anyway.  

What's your favorite fruit salad?  Please share in the comments to this post.


Jessie Walker's Banana Salad

4 lg. Bananas
Crushed Peanuts

Dressing:
1/2 cup Mayonnaise
1/4 cup Brown Sugar
1 pinch Salt
1 tbsp. Butter

Directions:
1)  Slice bananas.
2)  Combine dressing ingredients in small saucepan.  Stir over low heat until smooth.
3)  In serving bowl, layer bananas, nuts and dressing.  Serve.

July 10, 2013

Pallet Succulent Garden


Check out this awesome pallet-and-chicken wire succulent garden I came across in Paso Robles!  I'm taking inspiration from their use of moss and natural building materials.  I also love how all the different shades of green give texture and depth to this garden.

What are the most interesting garden settings you've built or seen?  Please leave a comment below.

June 16, 2013

Fabric Flower Craft


I tried a fun new craft, making flowers for pins or embellishments from silky fabrics.  This activity is not quite suited to my 4-H kids, since it involves an open flame, but it's quick and beginner-level easy. 

Use tulle, satin, and other high nylon fabrics. Cut rough flower shapes, using care to make them large enough as the flame causes them to shrink.  Ours were about 4-6 inches across before we finished them.  Use a candle flame to carefully finish off and shrivel the edges.  The burning will prevent them from raveling.  Stack multiple layers to make a flower; ours took about 7-10 layers each.  Textures and colors will create great effect.  Sew a quick whip stitch to hold all the layers together, and consider using a bead or button in the center of the flower. 

We attached a pin back to these, but I thought it would be great with a clip-on earring backing as a shoe clip, or sewn to a purse.  They're also great for gift bags.  Where would you use these?  Have you ever made these before?  Please leave a comment on the blog.


Rum Hard Sauce for Bread Pudding


Okay, I cheated and made the bread pudding from a mix....but the Rum Sauce was not included.  I liked the sauce recipe enough to keep it, so wanted to add it to my blog's index. Fast, easy, simple, butter and brown sugar.  Oh and rum.  You won't be sorry.

Rum Sauce

1 Tbsp Butter
2 tsp. Cornstarch
1/3 c. Brown Sugar
3/4 c. Milk
1 Tbsp. White or Dark Rum

Directions:
1.  Melt butter in a small saucepan over medium heat.
2.  Mix together the sugar and cornstarch, and stir into the butter.
3.  Pour in milk.  Cook stirring frequently until the mixture begins to boil.
4.  Continue cooking until thick, stirring constantly.
5.  Remove from heat, and stir in rum.  Serve warm.

June 6, 2013

Little Free Library for Glendale Community's Culinary Department


I just finished my first college course in fifteen years!  I took Culinary 111, Fundamentals of Professional Cooking I, at the local Glendale Community College.  I was surprisingly impressed with the Glendale Campus.  The culinary department has its own building, but it is more of a temporary structure and a new building is being constructed next year.  

The small space they're in now does have an entryway with a couple of side tables, and I thought it was a perfect place for something they surprisingly didn't have--a place for students to trade cookbooks and fiction devoted to what we're studying.  So I took it upon myself to create a "Little Free Library" of sorts.  The basic idea is a sort of box, usually about 2x3 feet, where one can take a book and leave a book.  My original idea was to get some sort of children's play stove and convert it to hold books, but my student budget limited me.  Since this library is to be indoors, a stack of books on a table is not unreasonable, so the minimum necessary was a sign.  What I came up with is simple and clean, meant to be stood on a plate stand next to the books.  I used bright eye-catching colors and painted a bit of a border to make it less plain, and accented the intention that this collection is to be for the department. The frontal photo I took didn't really show the border, and the angled shot distorted the text, so I've posted both.

It's the end of the semester, so this library won't be set up till the start of the new term.  I can't wait to see what else is contributed, and who might learn or try something new from something they picked up off our pile!  I'll be looking for its home when the culinary department moves to the new building too.  I'm hoping the next time I visit I'll find cookbooks, memoirs of restaurant occupations, biographies of famous chefs, kitchen gardening books, and stuff I haven't even thought of....and that the bookplates have lists of students that have read and returned.


May 7, 2013

Baked Acorn Squash with Cranberry-Orange Compote


My culinary class finally made it to vegetables.  I can't believe only one class is devoted to veggies, but we made the most of it.  My group did a lovely acorn squash dish that was so sweet and yummy.  I've blogged about baked squash before, but I've never made a cranberry sauce for squash or any other dish.  I know I will make this again at home, for special occasions and for every day meals.  We were give two versions of a cranberry sauce in our recipe packet, and the one we made was the second.  We probably could have let it simmer and reduce further to make it thicker, but were constrained by time in the class.  It still looked as good as it tasted!

Baked Acorn Squash

Yield:  8 servings

8 oz. Butter, melted
5 oz. Brown Sugar
4 Acorn Squash, halved, seeded
3/4 tsp. Salt or to taste
1/4 tsp. Pepper or to taste

Directions:
1.  Preheat oven to 350 degrees F.
2.  Heat the butter and brown sugar together in a saucepan to make a glaze.  Brush it on the squash.  Reserve the remainder of the glaze.
3.  Bake the squash halves, cut side down, until they are almost tender.  Baste them periodically with the reserve glaze.  Finish cooking with cut side up.
4.  To serve, cut the squash into wedges.  Spoon hot cranberry compote or cranberry sauce (recipes below) over the squash.

Cranberry-Orange Compote

1 1/2 lbs. Cranberries
9 oz. Orange Juice
6 oz. Water  (as needed)
2 1/2 Tbsp. Sugar (as needed)
2 1/2 oz. Orange zest, blanched

Directions:
Combine the cranberries, orange juice, and water to barely cover the berries.  Add sugar to taste.  Simmer the berries over medium heat until they are softened and thickened, approximately 10 minutes.  Add the orange zest. 


Cranberry Sauce

Yield:  1 Qt.

12 oz. Cranberries, fresh or frozen
12 oz. Sugar
2 Tbsp. Orange Juice Concentrate
2 Tbsp. Orange Zest
1 Tbsp. Ginger, fresh, minced

Directions:
Combine all ingredients and bring to a boil.  Simmer for ten minutes, skim and cool.


May 5, 2013

Celiac Foundation's Gluten Free Expo


I spent a Sunday afternoon roaming around the Celiac Foundation's Gluten-Free Expo and learning about products available for specialized diets.  There's a roundup of the day on their website here including a list of all the vendors present and lots more photos.

In addition to a whole list of books (mostly cookbooks) that I want to add to my wish list, there were wonderful samples from companies I wasn't familiar with.  My favorites were grain-free crackers, falafel chips, parmesan crisps, and gluten-free bread.  There were some tasty desserts, as well as lots of baking mixes and even gluten-free mac and cheese.  

I met several nutritionists that I hope to keep in contact with and learn from.  If I practice as a health coach or nutritionist, I know that I will encounter many people who are looking to eliminate gluten from their diet, so I'm really glad to learn more about this circumstance.  I'm already preparing for a future career.


May 1, 2013

Tea Tasting at Chado Tea Room


A groupon-type deal allowed me to learn a bit about tea types and history from Chado Tea Room in Pasadena.  We were able to try about eight different teas, capped off with a lovely dessert of scone and clotted cream.  Our guide walked us through each type, explaining the difference in manufacturing, from leaf type to oxidation.

The tea wall at Chado Tea Room
My friend Jenny and I enjoying a ladies' day out
Our tea sampling progressed from light to dark, starting with a White tea, then Yellow, Green, Oolong, Black, and Pu-erh.  We also got to sample a few of the staffs' favorites, a blossoming tea and an herbal Jasmine.  The colors themselves were striking as each cup lined up next to one another.  


Our waiter explained we began with white tea because it is un-oxidized and sun dried only, the least-processed type of tea.  Yellow tea is similar, but the buds are unfurled before sun drying.  Leaves are then piled, covered or wrapped, and kept damp at temperatures between 77-95 degrees F until it turns yellow.  Green tea is dried and rolled, but not oxidized.  We were shown the dried buds, which are twisted into tight marbles.  The history of the term "Monkey Picked" was explained, implying the most difficult to harvest from the steep mountainsides; it's now used to mean the best product made of a variety or particular company.  The partly oxidized Oolong tea was a favorite of mine.  I learned that Black tea is made from leaves that have been fully oxidized, the oxygen coming into contact with the enzymes in the tea leaf, creating the deep, dark color.  Lastly, we sampled a Pu-erh tea, which is a type exposed to bacterium and allowed to undergo a sort of secondary fermentation.  Pu-erh tea had some of the best stories as we were told it is the only tea that improves with age, much like wine, and has been used as currency, with parents buying a bar of Pu-erh upon the birth of a child, and selling it at an inflated rate when the child reaches adulthood.  

Monkey-Picked Oolong Tea (looseleaf)
We passed around a bar of compressed Pu-erh and appreciated its design.  Each tea leaf was brought out in its post-steeped stage, so we could see how it unfurled.  The discussion was wide-ranging and in-depth, covering manufacturing, tea types, history, blends, decaffeination, how to buy and store tea, and ideal length of steepage. 

Warm Scones and Clotted Cream with Jam and Chocolate Mousse Cups
The dessert was heaven!  My next trip to Chado will not be for the tasting, but for high tea, which comes with many more tea sandwiches and pastries. And to top it all off, our server demonstrated a blossoming tea, a tied ball of tea that unfurled when steeped to great effect in a clear glass teapot.  I brought home a small bag of the blossoming "Peach Fairies" and a bit of strawberry-flavored Alice's Wonder Tea.  My strawberry tea lattes have been sending me happily to night-time dreamland since.

Peach Fairies


April 29, 2013

Butternut Squash Soup with Caramelized Apples


After the midterm of my culinary class, we waded into soup territory.  Squash soup is one of my favorites to eat, though I don't often make it.  This one sounded wonderful, but our school's kitchen stocks only meat stocks.  Had I been able to substitute veggie stock, I would have loved to sample it.  I was so bummed out that once again I was cooking something I couldn't eat that I didn't even take a picture of the soup itself.  The garnish, however, was heaven--apples sauteed in butter and brown sugar!  I focused on that.  It will make a great topping for any fall soup, like split pea or cauliflower bisque.  Yum, soup! 

Butternut Squash Soup with Caramelized Apples

Yield:  1 Gallon

4 oz. French Bread
1 oz. Butter

1 oz. Butter
4 oz. Onions, small dice
4 oz. Leeks, small dice
6 oz. Carrots, small dice
2 lb. Butternut Squash, medium dice
3 Qt. Chicken or Vegetable Stock
3/4 tsp. Salt
1/4 tsp. White Pepper
1/4 tsp. Allspice, ground
1/4 tsp. Ginger, ground

12 ea. Croutons
3/4 lb. Apples, tart, firm cooking
3/4 oz. Butter
1 oz. Brown Sugar

6 oz. Heavy Cream

Directions:
1.  Cut the bread into 1/2 inch thick slices and fry the bread in 1 oz. butter until golden brown. 
2.  In a heavy sauce pot heat 1 oz. butter over moderately low heat.
3.  Add the onions, leeks, and carrots.  Sweat until they are about half cooked.  Do not brown.
4.  Add the squash, stock, and bread.  Simmer until the vegetables are tender.
5.  Puree the soup with a food mill, then bring the soup back to a simmer.
6.  Prepare the croutons.
7.  Peel and core apples.  Cut into small dice.  Heat 1 oz butter in a saute pan and add the apples and sugar.  Cook over moderate heat until the apples are brown and caramelized.
8.  At service, if used, heat the heavy cream and add to the soup.

April 21, 2013

Knife Cuts and Skills


A main focus of any beginning culinary class is gaining confidence, speed, and accuracy with basic knife skills.  My class was no exception.  We were encouraged to practice, practice, practice and taught many different cuts and shapes.  

ARD Culinary Concepts makes visual knife cuts models that are a must for a culinary student.  At Chef's recommendation, I also got the book The Professional Chef's Knife Kit by the Culinary Institute of America.  A good portion of our midterm test was made up of a knife skills practical exam, and we were not told which cuts would be on it.  The ziploc in the photo above is a 5-lb bag of potatos reduced to a medium dice as practice.


Technical specifications:  the large dice is a culinary knife cut measuring ¾ inch × ¾ inch × ¾ inch.  The batonnet measures ½ inch × ½ inch × 2½-3 inches. It is also the starting point for another cut, the medium dice.  The medium dice measures ½ inch × ½ inch × ½ inch.  Measuring ¼ inch × ¼ inch × 2½-3 inches, the allumette is sometimes referred to as the "matchstick cut." It's also the starting point for the small dice.  The small dice measures ¼ inch × ¼ inch × ¼ inch and is produced by slicing the allumette into ¼ inch sections.   The julienne cut measures 1/8 inch × 1/8 inch × 2½ inches.  The brunoise knife cut (pronounced BROON-wahz) measures 1/8 inch × 1/8 inch × 1/8 inch.  The fine julienne knife cut measures 1/16 inch × 1/16 inch × 2 inches. It's also the starting point for the fine brunoise cut.  The fine brunoise knife cut (pronounced BROON-wahz) measures 1/16 inch × 1/16 inch × 1/16 inch. Tiny!

How are your knife skills at home?  Do you think they would compare on a professional level?  If you have a story of an ER visit due to cooking please leave a comment on my blog--hopefully it ended well.

April 10, 2013

Presentation on a Cheese Plate


The continuation of dairy week centered around my favorite food--cheese!  The assignment focused on presentation.  An array of cheeses, fruit and nuts were at our disposal for our group to do with as we wished.  We used our knife skills to give visual interest through different shapes, and added nuts and grapes for texture as well as taste.  

My groupmates created the idea of cream-cheese stuffed grapes.  They made for a beautifully elegant presentation.

We were also encouraged to forage for fresh herbs on the grounds surrounding the building.  The only edible that caught my attention was rosemary.  I finely chopped dried apricots and figs and combined it with some minced fresh rosemary to make a coating for a goat cheese log.  My goat cheese was one hit of the evening! 


April 8, 2013

Broccoli & Cheese Souffle


Finally!  We made it to dairy week in my culinary class.  I felt a downward slide, definitely over the hump of the worst of the class, as we came upon techniques that I was familiar with.  Our group was assigned a souffle, one of my favorite dishes as a kid.  My mom's style was a bit different, though.  I was taught not to overmix the egg whites, while my Chef showed us to fully if gently incorporate the mixture.  I'm not much of a broccoli lover, but the minced broccoli was so subtle when everything was smoothly mixed, that it was a yummy addition to this recipe.


Basic Savory Souffle Recipe

Note:  A souffle begins as a Bechamel sauce. Eggs are separated with the yolks incorporated into the sauce and the whites beaten to just stiff peaks.  Before folkding in the beaten egg whites, the souffle is given its flavor by adding something:  grated cheese, herbs, minced bacon, vegetables (like spinach or broccoli), sausage, or other meats or fish.  The souffle dish is greased and the souffle is baked until puffed and done.

1/4 C. Butter or Margarine (half cube)
1/4 C. Flour
1/4 tsp. Salt
1/4 tsp. Dry Mustard
dash Cayenne or Red Pepper Flakes

1 C. Milk
3 Eggs, spearated
1/4 tsp. Cream of Tartar

1 C. Grated Cheese
other ingredients for flavor

Directions:
1.  In a saucepan, make the bechamel sauce:  melt the butter, add teh flour and seasonings (salt, mustard, and pepper) and blend well.  Add the milk and stir until thickened.  
2.  In a KitchenAid mixer, beat the egg whites until foamy.  Add teh cream of tartar and beat until stiff.  
3.  Beat the egg yolks and add to the sauce (must be tempered when added).
4.  Add any cheese or herbs or other minced ingredients to the yolk mixture.
5.  Fold in about 1/4 of the beaten whites to lighten the mixture.  Then gently fold in the rest being careful not to "pop the air bubbles."
6.  Pour into a greased souffle dish (you may want to first dust the pan with parmesan cheese).  Bake in a preheated 350-degree oven until puffed and set; knife should come out clean.  Serve immediately.  It will fall.  

*For a hot dessert souffle:  Egg yolks are combined with sugar and beaten until light.  Flour is added to this.  A little hot milk is added slowly and tempered in.  Flavoring is added.  Egg whites are beaten and folded in. 


April 3, 2013

Wild Rice Salad with Red Wine Vinaigrette


On our first heavy meat-course day of culinary lab, I made a wild rice salad to act as a bed for the cracklings and meat (duck?  pork loin?  I can't remember and I don't know my meat well enough to identify in the photo).  

We improvised on the fly when a few ingredients were missing from our lab.  This salad is a combination of wild rice, white rice, dried apricots, red onion, and dressing.  The dressing is similar to one we did a few weeks ago--but slightly different enough that I'll post it below.


Wild Rice Salad

Yield:  24 2.7-oz. servings

1 Lb. Wild Rice
1 1/2 Lb. Long Grain White Rice
4 oz. Apricots, dried
12 oz. Red Onion, chopped
4 oz. Walnuts, toasted, chopped
Water, as needed
Kosher Salt, as needed

Directions:
1.  Rinse the wild rice and place in a stock pot with 1 gal. salted water; simmer about 40 minutes or until the ends of the grains have begun to split open.
2.  Cook the long grain rice using a rice maker.
3.  Steep the apricots in boiling water until hydrated, then drain.
4.  Drain the wild rice and toss with 3 fl. oz. vinaigrette (below).  Cool to room temperature.  Add the long grain white rice.  Combine well.
5.  Add the remaining ingredients and mix the salad; toss with more vinaigrette to bind and season. Rest at room temperature for 30 minutes.  


Red Wine Vinaigrette

Yield:  10 fl. oz.

3 fl. oz. Red Wine Vinegar
1 fl. oz. Dijon Mustard
6 fl. oz. Vegetable Oil
1 Tbsp. Shallots, minced
1 tsp. Garlic, minced
3 Tbsp. Parsley, minced
Salt & Pepper, to taste

Directions:
Whisk all ingredients together and adjust seasoning to taste.


March 25, 2013

Tomatoes and Ladybugs


I planted my tomato seedlings from Tomatomania at the end of March this year.  I did seven starts, with a couple of duplicates, that included all my favorites:  Sungold, Isis Candy, Striped Cavern, Green Zebra, and maybe a Pineapple.  

Problems in my watering system have meant they haven't gotten a great start this year, but I did try to give them a push by releasing some ladybugs into my garden.  I dropped most of them onto the Hibiscus plants that I am training into a hedge. It was so fun watching them disperse over the course of the next several days!  They're released at sunset, when the cooler temperatures encourage them to stay in the area.  The wood shavings are from the container in which the ladybugs were packaged.  

Have you ever experimented with beneficial insects in your garden?  Please leave a comment with your experience in releasing them, and whether or not it had an effect on your plants.


March 21, 2013

Sun-Dried Tomato and Basil Aioli


To practice the standard breading procedure in my culinary class, we made chicken tenders, pork tonkatsu, and deep fried squid, all using the same fryer/oil.  Since I don't eat or cook any meat (including fish), I made the aioli dipping sauce within my group.  It was yummy even with fresh vegetables, but would be great with a veggie tempura. 

Sun-Dried Tomato and Basil Aioli

Yield:  1 qt.

4 Garlic Cloves, mashed to a paste
4 Egg Yolks
2 Tbsp. Lemon Juice
1 1/2 pt. Olive Oil
4 oz. Sun-dried Tomatoes
4 Tbsp. Basil, fresh, chopped
1 tsp. Salt
1/2 tsp. White Pepper

Directions:  
1.  Combine the garlic, egg yolks, and a few drops of lemon juice in a bowl and whip until frothy.
2.  While whipping the egg yolk mixture, slowly add theoil until an emulsion begins to form.  Continue adding the oil while whipping until all the oil is incorporated.  A few drops of lemon juice may be added from time to time to thin the sauce.
3.  Finely chop the sun-dried tomatoes.  Add them along with the basil to the aioli.  
4.  Season to taste with salt, pepper, and lemon juice.

March 18, 2013

Homemade Mayo


One culinary lab, each person had to make mayo from scratch.  It takes a lot of arm strength to whisk 7 oz. of oil into one egg yolk.  Several people had to make multiple attempts after their mayo broke, or separated, but I was able to reach the right consistency on the first try.  We learned something about alchemy too--turns out making it in a steel bowl will result in a change of color, and the mayo won't be white but a yellowish hue.  Next time I'll use glass!

Mayonnaise

Yield:  1 Cup

1 Egg Yolk
Salt & White Pepper to taste
1/4 tsp Dry Mustard
1 tsp Wine Vinegar
7 fl. oz. Salad Oil
Lemon Juice to taste

Directions:
1.  Place the egg yolk in a bowl and whip until thick and lemon-colored.
2.  Add the dry ingredients and half the vinegar to the yolks; whisk to combine.
3.  Begin to drizzle the oil very slowly while whisking until the mixture begins to thicken and an emulsion starts to form.
4.  Add the remaining oil in a slow steady stream, thinning the mayonnaise occasionally by adding a little vinegar.  Continue until all the oil and vinegar have been incorporated. 
5.  Adjust the seasonings and add lemon juice to taste.
6.  Refrigerate unitl needed.

Note:
The mayonnaise will become very thick as more oil is added.  A small amount of liquid can be added if it becomes too thick.  Alternate between oil and liquid two or three time until all the oil is added and the correct consistency is reached.

Important:
A large egg yolk can emulsify up to 7 fl. oz. of oil; adding more oil may cause the mayonnaise to break and separate.

Vegetable Side Salads

Gemischter Salat (German Mixed Salad")
We've made a couple of sixties-era side salads in my culinary class that remind me of my mother's cooking.  Not my favorites, but again, we're practicing knife skills, and learning to make a few dressings on the way.  I'm just glad that there are some vegetarian dishes I can cook, though it seems that vegeterian entrees have been forgotten, and veggies have been relegated to the world of salad only. 

This German Mixed Salad has a nice Mustard Vinaigrette Dressing that I will use on other dishes.  I do like the pretty julienned veggies on a bed of lettuce.  The Macedoine of Vegetables looks like a bag of mixed frozen veggies slathered with mayonnaise, but they were hand cut for our class.

What type of side salads do you serve, other than the typical greens, and where did you learn to make them?  I'd love to hear your comments on my blog.

Macedoine of Vegetables Mayonnaise
Gemischter Salat (German Mixed Salad)

Yield:  4 Servings

3 oz. Carrot, julienne
3 oz. Celery, julienne
5 oz. Celery Root, julienne or Parsnips, blanched
4 oz. Red Onion, julienne
4 oz. Cucumber, peeled, seeded, & julienne
4 oz. Tomato concassee
6 fl. oz. Mustard Dressing
Salt & Pepper to taste
1 head Boston Lettuce

Directions:
1.  Combine all ingredients except the lettuce in a stainless bowl.  Toss gently to combine.  Season to taste with salt and pepper.
2.  Separate, wash, and dry the Boston lettuce leaves.  Arrange the salad on the leaves and add a generous grating of black pepper.  


Mustard Vinaigrette Dressing

2 Tbsp. Dijon Mustard
2 fl. oz. Red Wine Vinegar
Salt and Pepper to taste
6 fl. oz. Canola Oil
1 Tbsp. Olive Oil
2 Tbsp. Water, hot

Directions:
Combine the mustard and vinegar.  Season with salt and pepper.  Whip in the oils to emulsify.  Add the hot water and whip until smooth.


Macedoine of Vegetables Mayonnaise

Yield:  12 2-oz. servings

8 oz. Carrots, cooked, small dice
8 oz. Turnips, white, cooked, small dice
4 oz. Green Beans, cooked, sliced into 1/4 inch pieces
4 oz. Green Peas, cooked
1/2 C. Mayonnaise, or as needed
Salt & White Pepper to taste
12 ea. Lettuce Cups for under liner, or baby salad mix
12 ea. Tomato Wedges, garnish

Directons:
1.  Chill all ingredients before combining.
2.  Place all ingredients in a bowl and mix until evenly combined.  Use only enough mayonnaise to bind.  Season to taste.  The completed salad mixture must be kept chilled at all times.
3.  Place the lettuce bases on plates.  Using a No. 16 scoop (2 oz.), place a mound of salad on each base.  Garnish with a tomato wedge.

March 9, 2013

Custom Adult Hula Hoops


I made some adult hula hoops from pvc tubing a year or so ago, but hadn't taken the time to decorate them so I could use them in public.  I found some great plaid duct tape and finally hand wrapped them.  Now I have my own personalized, coordinated set of hand and waist hoops!  Can't wait to use them in class.

These sell for about $40-60 each on sites like etsy.  Now I understand why.  They take about two hours to do one hoop, and that was with a simple one-tape design.  If you use several colors, it can take even longer.  

What's your favorite piece of custom exercise gear?  Please leave a comment on the blog.

High English Tea with Chocolate Banana Quickbread

 
With the theme of "Roots," the assignment for March's Food Bloggers Los Angeles meeting was to bring a dish that's related to your ethnic heritage.  Given our diversity, this was sure to result in a fabulous spread.  True to form, there were those that went generations back to a foreign country, and a few who showed their heritage in the form of frozen mixed vegetables.  

I am a true mutt, with English, Irish, German and other indeterminate genetic roots.  I had to pick one, so I chose English, conceiving of a figgy bread pudding with my homemade chocolate banana bread as a base.  I got as far as the bread, but ran out of time for the pudding.  So, I rethought, and pulled out one of my favorite Longaberger baskets to make my own high tea.  To satisfy the appetite, I included dried figs, dried dates, lemon curd and marscapone for the quickbread.  To wash it down, I threw in bags of cucumber, chocolate hazelnut decaf, and passionfruit teas.

Our discussion topic centered around monetizing our blogs, a very important but daunting subject.  Listening to the group's varied experiences and suggestions again spurred me to return to blogging on a regular basis.


Banana Chocolate Quickbread

1 cup granulated sugar
1/2 cup (1 stick) butter, softened
1 1/2 cups mashed ripe bananas (about 4)
1 large egg
1 teaspoon vanilla extract
1 1/2 cups all-purpose flour
1 teaspoon baking powder
1 teaspoon baking soda
1/2 teaspoon salt
1/2 cup unsweetened cocoa powder
 

Heat the oven to 350 degrees F. Grease a loaf pan. Combine the sugar and butter in a large bowl and beat with an electric mixer on medium speed, scraping the bowl several times, until light and fluffy, 1 to 2 minutes. Add the bananas, egg, and vanilla and continue beating and scraping the bowl until well mixed, 1 to 2 minutes longer. Combine the flour, baking powder, baking soda, and salt in a medium bowl and stir with a whisk to blend. Add to the banana mixture and beat on low speed for 1 to 2 minutes, scraping the bowl several times, until the batter is well mixed.  Add the cocoa to the and beat on low speed for about 30 seconds, or until well mixed.  Bake until a toothpick inserted in the center comes out clean, about 50 minutes or longer. Let cool for ten minutes, then invert to remove from pan.

March 7, 2013

Ratatouille


The sum of my knowledge of Ratatouille before my culinary class consisted of the Pixar/Disney animated film.  In my class, we got to make the dish from scratch.  It involves a lot of dicing and mincing, which was the point as we were learning knife skills.  But we ended up with a hearty comfort dish, and one I know I'll make at home.

Ratatouille

Yield:  4 8-oz. servings

6 oz. Onions, medium dice
2 tsp. Garlic, minced
2 fl. oz. Vegetable Oil
6 oz. Green Bell Pepper, medium dice
6 oz. Red Bell Pepper, medium dice
6 oz. Eggplant, medium dice
4 oz. Zucchini, medium dice
12 oz. Tomato concassee
1 Tbsp. Basil Leaves, fresh, chiffonade
Salt & Black Pepper to taste

Directions: 
1.  Sweat the onion and garlic in the oil.
2.  Add the bell peppers, eggplant and zucchini and saute until tender.
3.  Add the tomato concassee, basil and seasonings, saute for 5 minutes.
4.  Adjust seasonings to taste.

Caesar Salad with Homemade Dressing and Croutons


I expected my culinary class to focus on classic sauces, but I was surprised with how many dressings we made from scratch.  We started off with a simple Caesar Salad, with homemade croutons and dressing.  To make this vegetarian, I omitted the anchovies called for in the dressing.  We served this the night we made Ratatouille, as a nice balance to the warm stew.

Caesar Salad

Yield: 4 Servings

2 lbs. Romaine Lettuce Leaves, cut into a large Chiffonade, washed, dried and chilled
8 fl. oz. Caesar Dressing (recipe below)
Grated Parmesan Cheese, as needed
Freshly Ground Black Pepper, to taste

Directions:
1.  Gently toss the Romaine lettuce in a large bowl with the dressing. 
2.  Place each portion on a plate and garnish with Parmesan cheese, croutons, and black pepper.


Caesar Dressing

Yield:  1 Pint (16 oz.)

3/4 tsp. Garlic, minced
1 oz. Parmesan, grated
1/2 fl. oz. Red Wine Vinegar
3/4 tsp. Whole-Grain Mustard
3/4 tsp. Dijon-style Mustard
1/4 oz. Anchovy Fillets, finely minced and mashed
3/4 tsp. Salt
1/4 tsp. Black Pepper
12 oz. Mayonnaise

Directions:
1.  Combine all of the ingredients by hand until uniformly mixed.
2.  Adjust seasonings to taste.


Garlic Croutons

Yield:  10 oz. 

2 oz. Butter, unsalted
1 tsp. Garlic, minced
8 oz. French Bread, cut medium dice
1 tsp. Parmesan Cheese, grated
1 tsp. Basil, dried
1 tsp. Oregano, dried
Salt and Pepper to taste

Directions:
1.  Melt the butter in a small saucepan and add the garlic.  Sweat the garlic in the butter over low heat until fragrant and translucent.
2.  Place the bread cubes in a bowl; add the Parmesan cheese and herbs.
3.  Pour the garlic butter over the bread cubes and immediately toss to combine.
4.  Spread the bread cubes on a parchment paper lined sheet pan in a single layer and bake at 400 degrees Farenheit.  Stir the croutons occasionally and cook until dry and lightly browned, approximately 15 minutes.