


I lost my beautiful, ten year old, first dog, first child, best friend,
baby boy Chance on October 11th, 2016. He was with me for a quarter of my life, and through most of my adult growing up. I had to make the choice to let
him go, something I've never had to do for another pet. The hole he
left in my heart is unspeakable, and I've had trouble telling his
story. His name came from the fact he took a Chance on me, a first-time
dog owner who had the great luck of having him fall in my lap
unexpectedly in the first place.
I want to tell both his beginning and ending, but this post is more about my grieving, as I've had so many friends lose pets recently, or perhaps am just hyper sensitive and noticing more since losing my baby. I didn't know how to memorialize him when I lost Chance, and I would have loved to have a list with different options in one place. Some of these were craft projects I made myself, some are things I ordered from others, and some were gifts. They've helped me to mark the importance of my Chance, and of his death, in my life.
I want to tell both his beginning and ending, but this post is more about my grieving, as I've had so many friends lose pets recently, or perhaps am just hyper sensitive and noticing more since losing my baby. I didn't know how to memorialize him when I lost Chance, and I would have loved to have a list with different options in one place. Some of these were craft projects I made myself, some are things I ordered from others, and some were gifts. They've helped me to mark the importance of my Chance, and of his death, in my life.

Firstly, I knew I'd have to decide what to do with his ashes. When Chance was sick with pneumonia about ten months before I lost him, I
took the time to search for urns, so that I wouldn't have to do that in
a hurry or when bereaved. I have multiple pets, and I knew I'd want urns to be in keeping with each other, but be distinguishable. I searched online and also specifically searched Etsy. I found two ceramic vases or urns that I could use ready-made, but ended up ordering one custom made from the same person's site. Artist HeamarKat is located near me in Long Beach, CA. I spent about $50 per urn for three urns, including shipping. I didn't know which I'd use first, but when the time came I was ready for Chance. Because the urn is ceramic and I live in earthquake-prone area, his ashes are in a bag inside the urn, so if it ever does break, I won't lose anything. I should mention the urn came plain--next I'll tell about how I personalized it.
The crystal sculpture came from 3D Laser Gifts. I bought a LivingSocial voucher that was offered in the fall for folks to use as Christmas gifts. I'm not sure I chose the right photo for it, as they made his paws look huge. The side table where I placed his urn next to the sculpture sits in the corner of my room, at the foot of the couch, and I have to admit that I like seeing his face peering up at me when I sit down. With the voucher, I spent about $30 for it. I think they run them often on sites like Groupon and LivingSocial, so hunt around a bit before purchasing direct from the site.
The crystal sculpture came from 3D Laser Gifts. I bought a LivingSocial voucher that was offered in the fall for folks to use as Christmas gifts. I'm not sure I chose the right photo for it, as they made his paws look huge. The side table where I placed his urn next to the sculpture sits in the corner of my room, at the foot of the couch, and I have to admit that I like seeing his face peering up at me when I sit down. With the voucher, I spent about $30 for it. I think they run them often on sites like Groupon and LivingSocial, so hunt around a bit before purchasing direct from the site.

The crematorium made an imprint of Chance's paw on a rough clay circle.
It didn't look finished, and they actually put a big gash in the clay
next to his pawprint, so I didn't want to affix it to Chance's urn.
Instead I got some sculpey clay from the craft store and made a reverse
print from the imprint they had made. I'd never used sculpey before, so
I did a few practice prints to see how much of the clay I should use, and which color I would like best - I bought a silver and a brown. In the end, I chose what I felt was the best print for his urn, which came out to be about three inches round. The smaller test prints I used jewelry findings to make a magnet, a keychain, and an ornament for my Christmas tree. The ornament one is made of the silver sculpey so it will stand out against green. I think it was the first print I made, and it was a bit offset in the circle of clay, which turned out to be a good thing as I could write his name and the date of his passing using a sharpie. I spent under $15 on the sculpey material for all these tokens, and baked them in my toaster oven so they are solidly finished.

I also had a tag made for my keychain with Chance's picture on one side and his birth and death dates on the back. If you order from k9.com use type B2 to get a photo only without a color border. They're about $10.

I've had the square magnet with the drawing of Chance for a long time. I order magnets in that style from Zazzle. They're cheap and make great personalized gifts. The pawprint magnet shows the shimmer of the silver sculpey I used.

I've gotten a few ornaments printed each year for the last several years from Picture It On Canvas. They have great holiday templates if you want to include a frame or text. They offer several different styles, but I usually order the metal ones. And they often run sales--I wait until I see a 72% off coupon to order. I wanted Chance on my tree, and to mark the occasion of this painful year, so I used the photo of his urn when the light first shone on it. The shape I used above is their "metal benelux."

Before Chance died, I used a nose impression kit ordered from DogEarDesign on Etsy to make an impression of his snout. I wanted someone local to cast it, because I was afraid of the mold being lost or damaged in shipping. But I couldn't find anyone around me, so again I turned to Etsy, and I found the most wonderful, sympathetic soul in Brenda of BrendaKesslerDesigns. She cast one nose with a hole to be worn as a necklace, and one without to be affixed to Chance's urn. She also scanned the pawprint that the crematorium had made, and reduced it to size to make a necklace medallion of Chance's exact pawprint. Both charms had a lovely tag on the back with his name, birth and death dates. I wear them every day. Lastly, I had gotten an Origami Owl locket some time ago, where I kept all of my babies' puppy teeth, as well as a whisker from Claire, and a bit of nail clipping from Chance (he had notoriously long nails). I did eventually take the locket off the chain when it once opened. I am keeping it at home until I am ready to permanently glue it shut.
The vintage chain that I first used eventually broke as I would take it on and off over my head, so I ordered a 24" Spiga silver chain from Dreamland Jewelry. I found the longer length to be a great way to keep the charms near without having people ask about him, as I could hide them inside my shirt on days when I didn't want to tell his story.
The vintage chain that I first used eventually broke as I would take it on and off over my head, so I ordered a 24" Spiga silver chain from Dreamland Jewelry. I found the longer length to be a great way to keep the charms near without having people ask about him, as I could hide them inside my shirt on days when I didn't want to tell his story.

A few years ago I did some photos of Chance and Claire to use to make silhouettes. It came in handy when I found a Living Social voucher for a customizable silhouette necklace from Monogramhub.com. The "My Dog Is Next To My Heart" necklace is available in a choice of breeds, or you can upload your own photo. I had Chance's made in sterling silver from the photo below.


I've long had a dream to have artwork of my pups in lots of different styles. My facebook friend Amy Estep painted this lovely watercolor of Chance. She works in acrylics or watercolors, and I specifically requested watercolor, since I don't have anything of the dogs in that style. We became friends because we are both active in rescue. She can be found on facebook or by email at gentlewinds2003@yahoo.com. Contact her directly for pricing.


Talented artist Lyn Hamer Cook occasionally runs contests on her facebook page for a "Pet of the Week." I sent her the above photo of Chance, and she painted the 8x10 oil painting of Chance below, along with three other dog paintings. Each pet owner had a weekend to garner "likes" on facebook of our individual paintings and the winner of the contest received the painting of the pet. Because I'd just lost Chance, lots of people rallied to help me receive the painting, and I'm so thankful. Find Lyn on the page "Dog Art by Lyn" on facebook or at her etsy shop linked above. An 8x10 oil painting is typically about $100.


A friend gifted me with this Mourninglight with Chance's picture and inscription, and it's been so comforting. I bought battery operated votive candles in the after-Christmas sales, so I don't have to worry about flames around my pets. I ended up putting this votive in my bedroom and light it as a ritual as I go to bed, when I would normally have been putting Chance up to sleep with me. It's a soft nightlight and my last kiss to my boy before bed. Either a black and white or color photo can be used. They cost around $30.

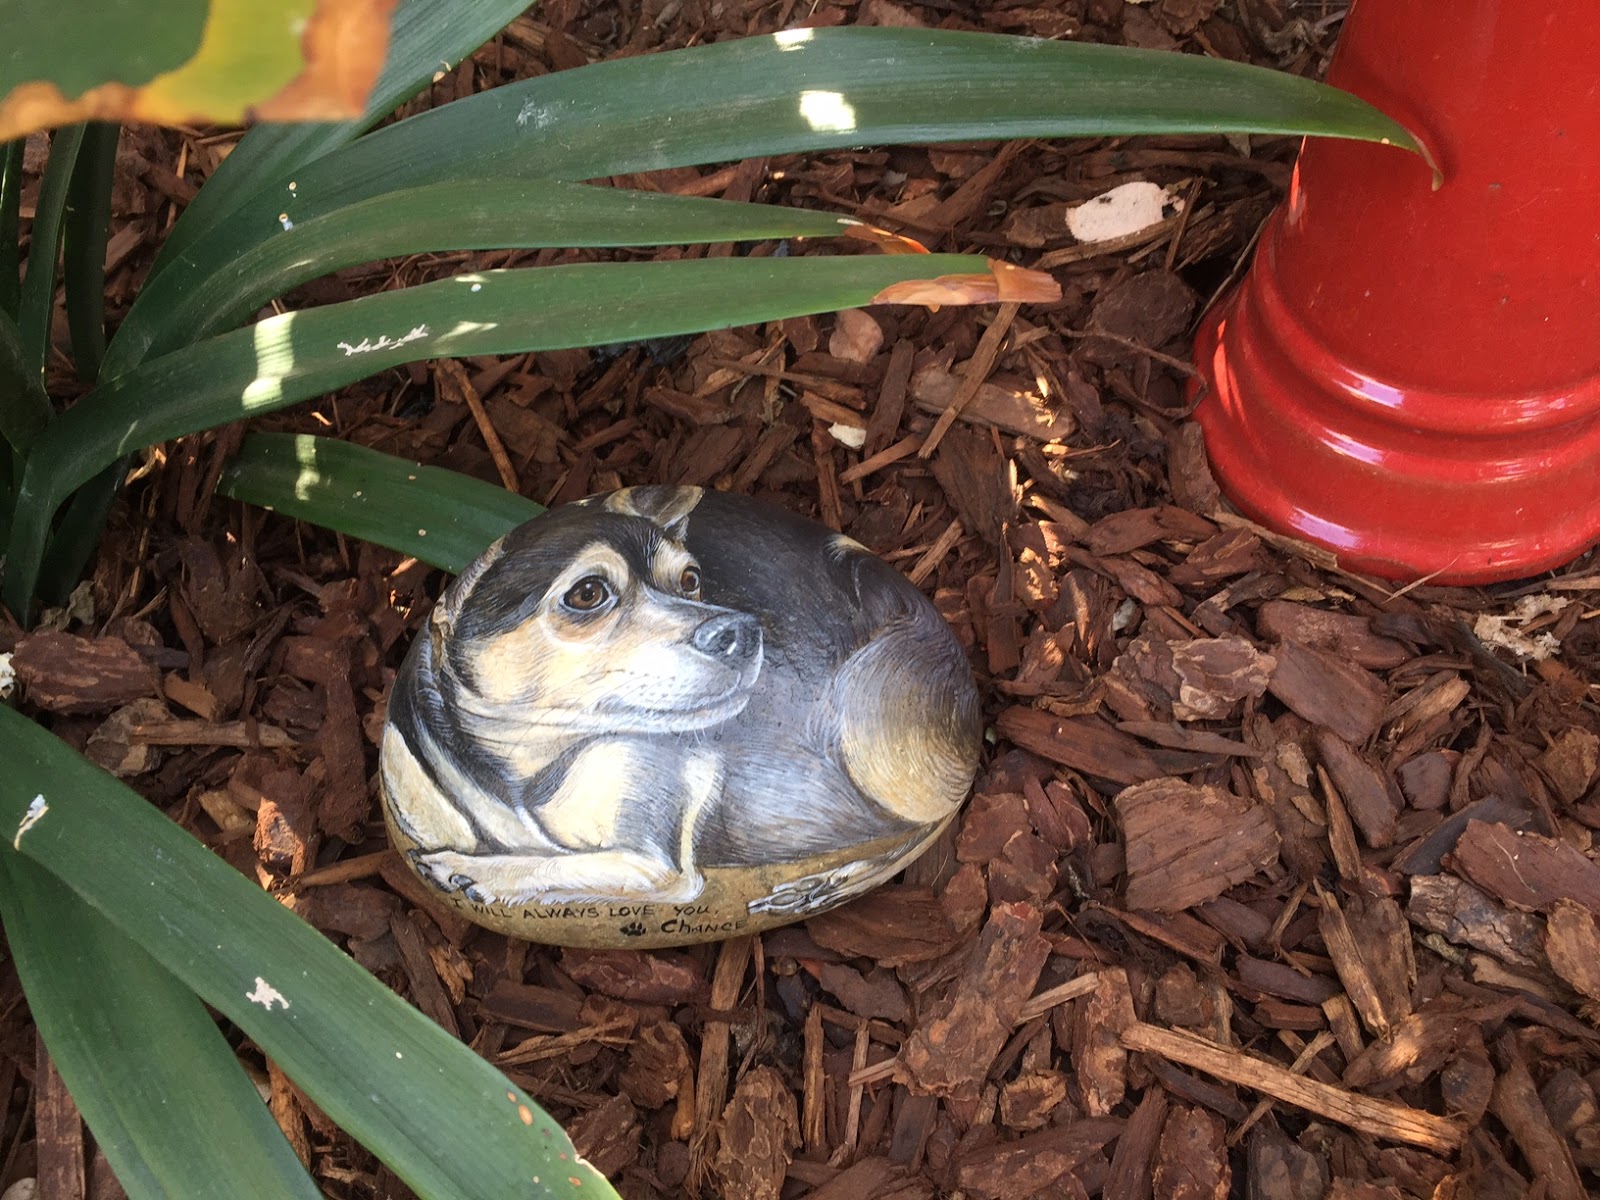
One thing I knew I would want to do at some point is to plant a memorial garden in Chance's memory. Lu Worman paints beautiful pet portraits on large smooth rocks perfect for a garden. I know her through rescue on facebook at Petrocks, but she also has an etsy shop called Lovepetrocks. I took so many photos of the stone she made for me because it has such detail. I found myself taking it in anew from a different angle each time I looked at it for several weeks. Prices vary depending on the size of the rock you order.


This pillow is a great huggable item when I'm missing my boy. I love the halo and angel wings they add. You upload three images in order of preference, and their digital artist will send you a proof before printed. A second image added to the back is an additional charge. For this two sided pillow, it was about $75 with shipping.
One thing I've not gotten, but looks really neat, are the stuffed likenesses of your pet made by Petsies. They're lifesize and life-like, custom made to match your photos. They run about $200.
One thing I've not gotten, but looks really neat, are the stuffed likenesses of your pet made by Petsies. They're lifesize and life-like, custom made to match your photos. They run about $200.


I was able to mash together a photo of the first moment I saw Chance with one of the two of us on the day he died, thanks to my phone. I printed the photo out myself as a 5x7 using the machine at the local Walgreens, then trimmed and laminated it at Kinkos. I punched holes in the laminating material and added some ribbons to create a bookmark. I actually made a few of these, and one of them I keep in the glove compartment of my car. I don't know how often I'll pull it out, but it comforts me to know he's near and available whenever I need a reminder of how very loved he was. This was another craft project that cost me under ten bucks, for printing, laminating, and buying the ribbon.

Here's Caitie with the bookmark for a bit of size reference--of her or of it, I'm not sure. She wanted to be helpful and involved when I was trying to photograph the object. ;o)


Another friend through a facebook pet page has done a digital portrait
of Caitie in the past. I had just taken a welcome photo for our facebook page about a month before Chance died. I wanted to keep his
memory alive on our pet page, but to make it obvious that he had passed
on so that people who were new to our page would understand. So I asked
Sir Luke's mom to add angel wings to this photo. She did a lovely
job. I've kept this as our cover photo since it was finished. If you'd
like to contact her about a digital portrait go here or email
sirlukethedoodle@gmail.com.

Another way I paid tribute to Chance was by making a donation to the
local shelter. Though Chance didn't come from a shelter, I knew he
would want me to pay it forward. It was a rainy day about a month after
he passed, when I felt ready. I got about 25 blankets from the local
store and took them to East Valley shelter to drop them off. I know the
animals there appreciated the small bit of comfort I was able to bring
to them.


The hardest part of all this has been moving on--changing my icons and even my phone case to pictures of the girls, to reflect my current status and avoid having to answer questions or state that I'd lost my baby. It took me months to design a phone case without Chance, and especially to be ready to change my google icon on my emails, on Skype, and other online sites to be one of me with just the girls.


My new profile/icon pic, just me and the girls.


