Subscribe Via Email

Like reading this blog? You can get the complete text of the latest articles at Within My Means in your email inbox each morning by entering your email address below, then verifying the subscription. Your address will only be used for mailing you the blog, and each one will include a link so you can unsubscribe at any time.

Enter your email address:

Delivered by FeedBurner

December 12, 2012

Cookie Swap 2012!


When I was growing up, we had a tin container, about 8 or ten layers high and a full 12-14 inches across that stacked one layer atop another, and had a metal handle that locked it all.  It was dented, and a bit less shiny than it used to be, but this was where all the best cookies lived each holiday season--the ones my mom wanted to take to her mom or mother-in-law.  There were other cookie tins we kids were allowed to "steal" from, but this one was traveling with us when we drove south to family to celebrate, so it was strictly forbidden until the trip. 

My folks recently retired, and I was dismayed to find that the cookie tower tin was donated to Goodwill in the move.  Of all my mom's kitchen appliances and tools, that was one that I would have treasured, the way she does her mom's "noodle cutter," with its chipped paint and rough handle that saw my grandmother through nine children during the depression and beyond.  

In any case, that tangible item is gone, but the memory is fresh.  Just before my first cookie exchange of the season, I came across this small bento lunch box.  Meant for a single person, it's only six or eight inches across, and tri-leveled.  It's so reminiscent of my childhood I had to have it!  And it's economical too--it's preventing me from bringing home from my exchange more cookies than I can eat, since I live alone.


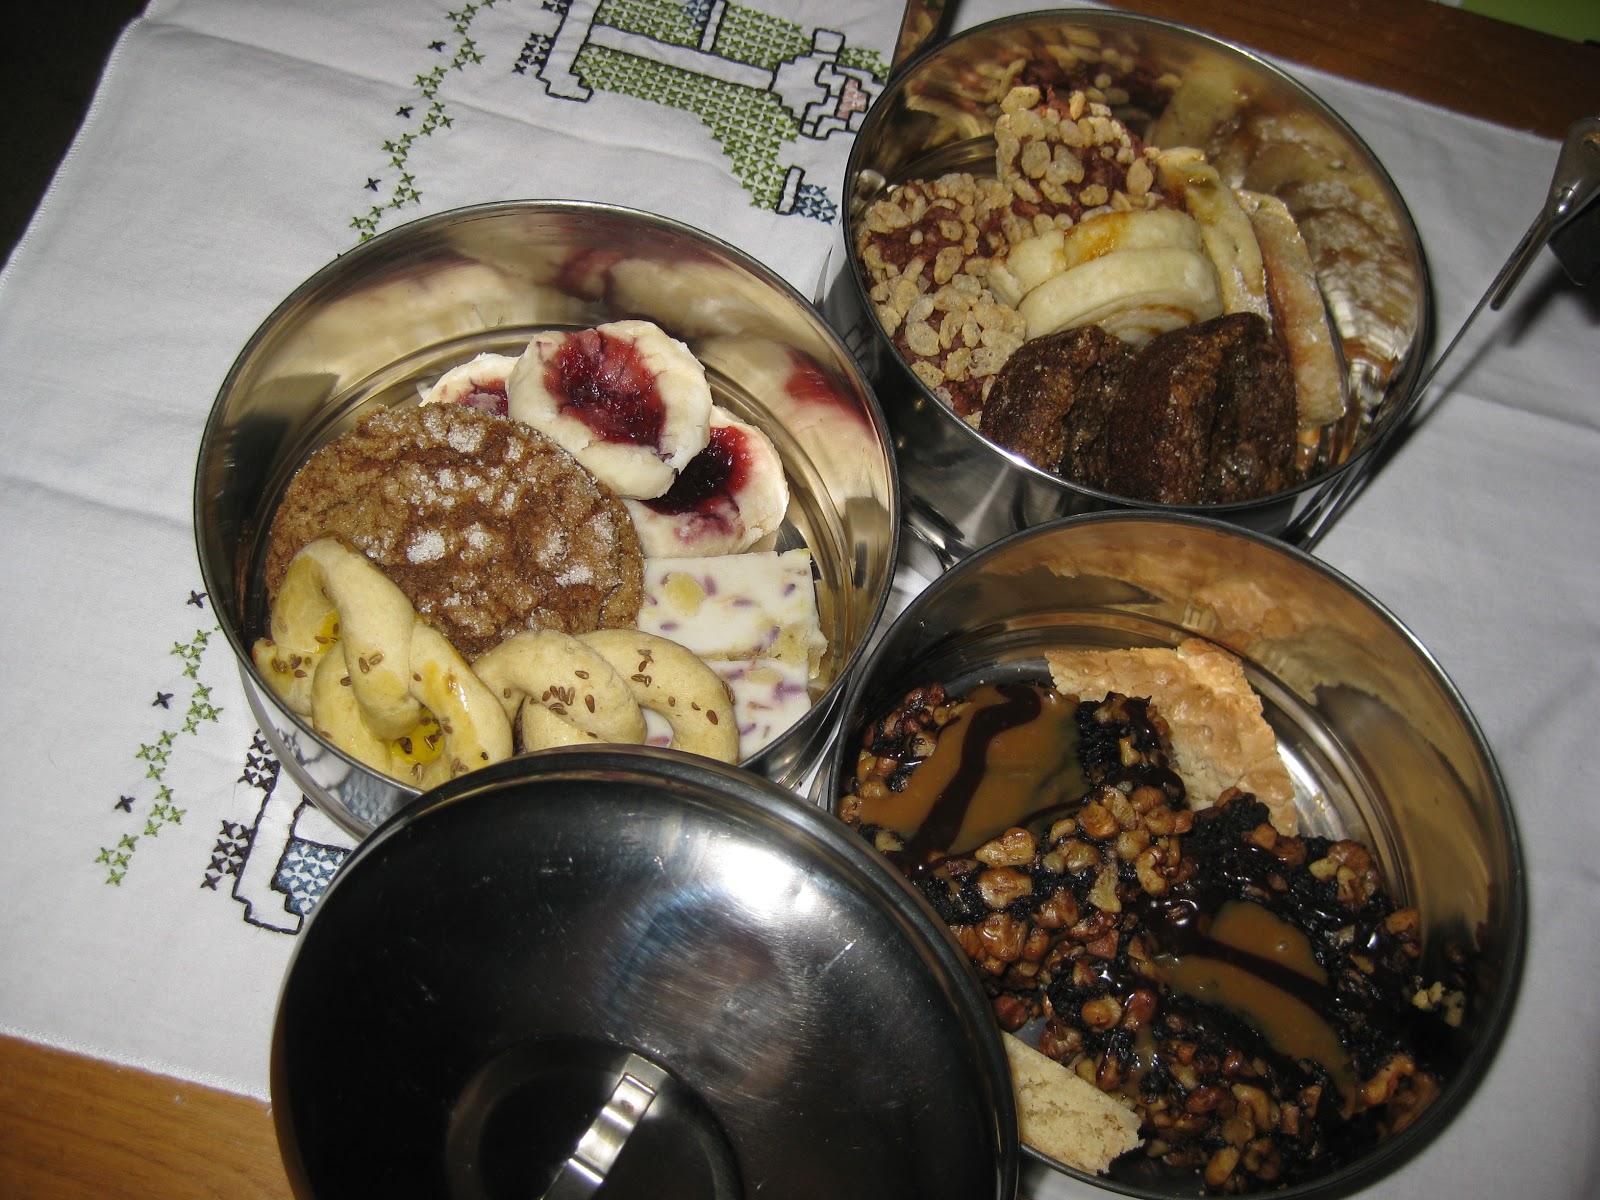
My friend Jen organizes a monthly craft day in a community room near her home.  The space is great to spread out, even if working on a quilt, and her group gets around thirty people each month given her freewheeling bring-whatever-you're-working-on nature.  Once a year we turn the end of the room into a bakers' paradise.  It's so great to come away with a mix of gift-quality goodies!  The variety adds

I have so little counter space at home that any kind of rolled or dropped cookie is out of the question.  So this year I did some internet searching for more innovative bar cookies, and came up with this Macadamia Bar cookie from Better Homes & Gardens.  The cookie dough is so densely solid it's like a cement mixer, so be sure the pan is prepared before mixing the dough!  There's a light hint of nutmeg that made these cookies a great substitute for the traditional nutmeg logs that my mom and brother make yearly, without the mess of rolling and cutting into logs.  It came with a wonderful eggnog icing recipe but I found I didn't need the extra sweetness, and was able to go without buying eggnog.  I made this recipe again a week later for another exchange, and dropped the dough into a molded pan.  The holly shapes held and made for a really festive touch.  Those pictures will be in my next post.

Which new recipes are you trying this year, and what are your traditional favorites?  Please leave a comment on my blog!


Macadamia Bars with Eggnog Drizzle
reprinted from http://www.bhg.com/recipe/bars/macadamia-bars-with-eggnog-drizzle/

Makes: 36 servings
Yield: about 36 bars
Prep 25 mins
Bake 350°F 25 mins

Ingredients
2 cups granulated sugar
2/3 cup butter
2 eggs
1 teaspoon vanilla
2 cups all-purpose flour
1 teaspoon baking powder
1/2 teaspoon ground nutmeg
1 cup chopped macadamia nuts
1 recipe Eggnog Drizzle (see recipe below)
Freshly grated nutmeg (optional)

Directions
1. Preheat oven to 350 degrees F. Line a 13x9x2-inch baking pan with foil, grease foil, set pan aside. In a medium saucepan, cook and stir sugar and butter over medium heat until butter melts. Remove from heat. Cool slightly.

2. Stir eggs and vanilla into sugar mixture. Stir in flour, baking powder, and 1/2 teaspoon nutmeg. Stir in nuts.

3. Spread mixture evenly into prepared pan. Bake in the preheated oven for 25 to 30 minutes or until edges just begin to pull way from the sides of the pan. Cool in pan on a wire rack. Use foil to remove uncut bars from pan; place on cutting board. Cut into diamonds. Drizzle with Eggnog Drizzle. If desired, sprinkle with freshly grated nutmeg. Makes about 36 bars.

From the Test Kitchen
Layer bars between sheets of waxed paper in an airtight container; cover. Store at room temperature for up to 3 days or freeze unfrosted bars for up to 3 months. Thaw and frost.

Eggnog Drizzle

Ingredients
1 cup powdered sugar
1/4 teaspoon vanilla
1 tablespoon eggnog
Eggnog

Directions
1. In a small bowl, combine powdered sugar, vanilla, and the 1 tablespoon eggnog. Stir in additional eggnog, 1 teaspoon at a time, until icing reaches drizzling consistency. Drizzle icing over bars.

Nutrition Facts (Macadamia Bars with Eggnog Drizzle)
Servings Per Recipe 36,
cal. (kcal) 144,
Fat, total (g) 7,
chol. (mg) 21,
sat. fat (g) 3,
Monosaturated fat (g) 3,
carb. (g) 21,
fiber (g) 1,
sugar (g) 15,
pro. (g) 1,
vit. A (IU) 97,
Thiamin (mg) 0,
Riboflavin (mg) 0,
Niacin (mg) 1,
Pyridoxine (Vit. B6) (mg) 0,
Folate (µg) 16,
Cobalamin (Vit. B12) (µg) 0,
sodium (mg) 39,
Potassium (mg) 28,
calcium (mg) 20,
iron (mg) 1,
Percent Daily Values are based on a 2,000 calorie diet

December 8, 2012

Handprint Wreath


Here's a fun and easy holiday craft for young kids. I love this image of a wreath! This one was made by my friends' five-year-old and she's treasured it for several seasons.

How do you celebrate the holidays in a handmade fashion? Please leave a comment on this post!

December 7, 2012

Food Bloggers Los Angeles' Cookie Exchange

the beautiful bloggers' spread
my contributions
The FBLA December meeting is the one meeting per year without a specific discussion topic or program.  It's simply a social party, with a glorious theme:  the cookie exchange!  No surprise, this is the one meeting where we have the most attendance, so we were sure to get a group shot.  Our hostess this year was one of our founders, Erika Kerekes. 

For 2012, I made the same Macadamia bar cookies I blogged about here, but baked them in a holly pan that lended a pretty shape.  I also used fresh lime juice from my friend's backyard tree to make Erika Kereke's lemon squares on a sheet pan so large I almost didn't think it would fit in my oven.  It did, but because of my slanted floor, one end of the bars was extra-limey and the other was a fine dry crust; the lime curd had slid to one side.  And of course, I had to try one new recipe....I've been on a bar cookie kick this holiday season due to the limits of my kitchen (no counters, only a bar sink, etc.).  I'm all for quick and easy one pan anything, whether it's main dish or dessert.  So I searched the web and hit upon Macaroon Bars with Oreo Crust.  A revelation--my favorite flavors, coconut and dark chocolate!  This is the closest I've gotten to a cookie with the flavor of Mounds candybars. 

We were doomed to be overloaded by sugar, so the call went out to bring a brunch potluck item along with your dessert.  I think four of us responded.  I'd just been to a fun day of hat decorating with another ladies' social group where I'd requested a recipe for a potato bake that had been brought to the event, and I decided to try it myself.  I forgot to take a picture of the finished dish, but I'm not too sorry.  I bought the potatos frozen, and dutifully thawed them overnight in the fridge.  Though I've used it to bake often, my KitchenAid Stand Mixer is still fairly new to me when main dish cooking; I learned a valuable lesson when I mixed up the potato as my Bake quickly turned into a Mash.  Next time I will use diced potatoes rather than shoestring hash, and will leave them fairly frozen when I go to mix it all up.  Still, it tasted good, and was completely gone.

Macaroon Bars with Oreo Crust

reprinted from Better Homes & Gardens
Yield: 48 bars
Prep: 40 mins  
Bake: 350°F 33 mins
Chill: 30 mins

Ingredients:
  • 2 cups crushed chocolate sandwich cookies with white filling (about 20 cookies)
  • 1/2 cup sugar
  • 1/3 cup unsweetened cocoa powder
  • 1/2 cup butter, melted
  • 1 teaspoon vanilla
  • 2/3 cup all-purpose flour
  • 1/3 cup sugar
  • 1/4 teaspoon salt
  • 2 3/4 cups flaked coconut
  • 3 egg whites, lightly beaten
  • 1/2 teaspoon vanilla
  • 1/2 cup semisweet chocolate pieces
  • 1 teaspoon shortening
  • Toasted whole almonds (optional)
 Directions:

1. Preheat oven to 350 degrees F. Line a 13x9x2-inch baking pan with foil, extending foil over the pan edges. Lightly grease foil. Set aside.

2. In a large bowl, stir together crushed cookies, 1/2 cup sugar, and cocoa powder. Stir melted butter and 1 teaspoon vanilla into the crushed cookie mixture until combined. Firmly press cookie mixture into the bottom of the prepared pan. Bake in a preheated oven for 8 minutes.
3. Meanwhile, in a large bowl, combine flour, 1/3 cup sugar, and salt. Stir in flaked coconut. Stir egg whites and vanilla into coconut mixture until combined. Spoon coconut mixture over crust. Using wet hands, carefully press the coconut mixture to edges of pan.
4. Bake for 25 to 28 minutes or until macaroon layer is set and lightly browned. Cool in pan on a wire rack.
5. In a small saucepan, combine chocolate pieces and shortening. Heat over low heat until melted, stirring constantly. Drizzle chocolate mixture over bars. Chill about 30 minutes or until chocolate sets. Using the edges of the foil, lift the uncut bars out of the pan. Cut into 24 bars. Cut each bar diagonally to make 48 triangles. If desired, place a whole almond atop each bar. Makes 48 bars.

From the Test Kitchen:
  • Place bars between sheets of waxed paper in an airtight container; cover. Store at room temperature for up to three days or freeze for up to 3 months.
Lime Diamonds

Cheesy Hashbrown Casserole was a bit mashed but looks like a hit!


Cheesy Hashbrown Casserole 

Mix one bag of frozen hash browns, 2 c. cheddar cheese, 1 can cream of mushroom soup, salt and pepper to taste. Pour in casserole dish and bake at 325 till warmed through and golden on top.

November 16, 2012

Birthday Cupcakes for my Dad


I made a cupcake celebration for my dad's 70th birthday.  I'm hoping the cups will help all of us with portion control.  I also used a Weight Watchers recipe I've posted about before, using pumpkin added to a box mix. but trying some adjustments this time for density.  The decors on top are Martha Stewart.  My dad likes poinsettias, so they always make me think of him.  I was kicking off my holiday season early, since I'm not sure I'll make it home for Christmas this year. 

Weight Watchers Chocolate Cupcakes

1 box dry chocolate cake mix
15 oz can plain pumpkin
3/4 cup water
1 egg
1 cup chocolate chips

Fill cupcake liners 3/4 full with batter and bake according to cake mix package directions.  This mix may take a little longer to bake so test with a cake tester or toothpick.  Ice with German Chocolate frosting.  Embellish with decorations.

November 3, 2012

Food Bloggers Los Angeles' Give Thanks


The FBLA had their Thanksgiving monthly meeting today.  One of the best reasons I appreciate this group is its' generous nature.  Always welcoming and open, he members share their ideas freely, whether it's knowledge of computers or recipes being sought.  While some are professional bloggers specializing in original recipes, there are also new bloggers testing the waters.  And the tidbits of learning come from all sides.


The week prior to the FBLA meeting, a friend of mine with a traditional 9-to-6 job sent a recipe for Pumpkin Mushroom Lasagne that she wanted to try, but didn't have time to make.  I was happy to bake for us, and she kindly agreed to buy the ingredients.  I'm so glad she suggested it!  I've found a new favorite lasagne, and it screams of fall, with notes of pumpkin and sage.  Try it; you won't be disappointed.


Pumpkin Lasagna
 
Reprinted from Taste of Home
Prep: 25 min. Bake: 55 min. + standing 


Ingredients
1/2 pound sliced fresh mushrooms 
1 small onion, chopped
1/2 teaspoon salt,
divided
2 teaspoons olive oil
1 can (15 ounces) solid-pack pumpkin 
1/2 cup half-and-half cream
1 teaspoon dried sage leaves
Dash pepper

9 no-cook lasagna noodles
1 cup reduced-fat ricotta cheese
1 cup (4 ounces) shredded part-skim mozzarella cheese 

3/4 cup shredded Parmesan cheese 

Directions
In a small skillet, saute the mushrooms, onion and 1/4 teaspoon salt in oil until tender; set aside. In a small bowl, combine the pumpkin, cream, sage, pepper and remaining salt.
Spread 1/2 cup pumpkin sauce in an 11-in. x 7-in. baking dish coated with cooking spray. Top with three noodles (noodles will overlap slightly). Spread 1/2 cup pumpkin sauce to edges of noodles. Top with half of mushroom mixture, 1/2 cup ricotta, 1/2 cup mozzarella and 1/4 cup Parmesan cheese. Repeat layers. Top with remaining noodles and sauce.
Cover and bake at 375° for 45 minutes. Uncover; sprinkle with remaining Parmesan cheese. Bake 10-15 minutes longer or until cheese is melted. Let stand for 10 minutes before cutting. Yield: 6 servings. 

Nutrition Facts: 1 piece equals 310 calories, 12 g fat (6 g saturated fat), 36 mg cholesterol, 497 mg sodium, 32 g carbohydrate, 5 g fiber, 17 g protein. Diabetic Exchanges: 2 starch, 2 fat, 1 lean meat.


October 23, 2012

Pumpkin Mushroom Quinoa Casserole


I made an excellent dinner last night.  I've been trying to accent seasonal flavors lately, but I have to admit I'm almost pumpkin-ed out.  Adding mushrooms to this mash adopted from Leanne Vogel at HealthfulPursuit.com created just the right subtlety.  Using only what I had in my cupboard, this dish was warm and filling.  The cinnamon is strong but not overpowering, reminiscent of a greek dish made by a friend of mine.  Thinned with just a little more liquid, this would make a stellar vegetarian stew as well.  I loved getting the chance to cook in my vintage Pyrex too!  It climbed up the side when it was boiling and bubbling as I took it out of the oven, which was not so pretty for the picture, but it sure looked appetizing while hot!

What are some of your favorite vegetarian soups and stews?  Please leave a comment below this post.  

 Pumpkin ~ Mushroom Quinoa Casserole
  • ⅔ cup soy milk
  • ¼ cup pumpkin puree
  • ¼ cup raw quinoa
  • ¼ cup sliced mushroom
  • 1 can mushrooms
  • 1 tbsp maple syrup
  • 1 tsp olive oil
  • ¼ tsp pure vanilla extract
  • ½ tsp ground cinnamon
  • pinch ground nutmeg
  • pinch ground ginger
  • couple cloves fresh garlic (if desired)
Mix all together, pouring into a casserole dish, and bake at 350 for 30-40 min.


October 22, 2012

Secret Santa by International Mail


I found a great Facebook group for the holidays this year, where members are participating in a "Christmas Secret Stitchy Santa" trade of a small cross stitch or needlepoint gift item.  I love the enthusiasm of the members, and the casual attitude of the coordinator.  There aren't a lot of rules that make it complicated to participate.  It's simply about making new online friends with someone who shares your hobby. Though I won't actually meet my exchange partner, this trade is making these online friends feel more "real."  I love that my online life is crossing a fuzzy border into reality.

Actually, the reason I was able to participate was that I already had a small gift prepared.  So there's no time crunch, procrastinating-then-stressing in my future.  And the anticipation of something fun coming in the mail just for me is so exciting!  My gift is traveling all the way to England.  I'll be sure to post a picture when it arrives (*wink*).

If you'd like to join in, it may be a little late for this year, as we've already been matched up with partners.  But you can always start your own exchange for this or any other craft.  And you can join our group to see the results as we post photos of our mail!

(non-spoiler alert:  illustration is Not the actual item I'm sending off)

October 20, 2012

Pumpkin ~ Cream Cheese Dip with Gingersnaps


The potluck themes at the monthly Food Bloggers Los Angeles' meetings draw me into the season.  This month featured pumpkin in our cooking, which to me meant one thing:  dessert.  I made a Pumpkin ~ Cream Cheese Dip dusted with graham cracker crumbs and served alongside some commercial gingersnaps for dipping.  It would also serve well as an easy and flavorful appetizer for a buffet-style party.

It goes without saying that the desserts at our meeting were exquisite and scrumptious.  I was more impressed by the creativity in the non-dessert items, such as Pumpkin Hummus, Pumpkin-Potato Pancakes, and even a Creamy Pumpkin Dressing on a traditional salad.  Stay posted for the complete linky widget of pumpkin creations.


Easy Pumpkin ~ Cream Cheese Dip

2 8-oz pkgs cream cheese (room temp)
1 can pumpkin
1 tsp ground cinnamon
1/2 tsp ground cloves
1 cup powdered sugar

Cream all together.  Pour into serving dish.  Dust with graham cracker crumbs.  Refrigerate to set.  Serve with gingersnaps, graham crackers, pretzels, fresh veggies or fruit, or other good stuff for dipping.  For added fun, serve inside a fresh pumpkin that you've scooped to hollow out.

(the spread at the FBLA October meeting)

October 8, 2012

Pupcakes at the LA County Fair!

This year's LA County Fair offered a fun class on how to decorate cupcakes to look like dogs, or "Pup"cakes!  I watched the demos and made some notes so I can try this at home. My pictures are of the ones the instructor created, since I didn't get a space in the class to make my own.

 
 Chocolate Lab

For the cute Chocolate Lab, place 1/2 of a marshmallow on top of the cupcake before frosting to form the snout.  Use brown M&M candies for the eyes and nose.  The tongue is formed from 1/2 of a pink Starburst, flattened and shaped with a score in the tongue.  Fold it slightly in half before bending.  The ears are formed from a Tootsie Roll.  Just smoosh it to shape.

Sheepdog

The little Sheepdog has no eyes or nose, just lots of icing fur!  For the ears, use tiny triangles of Oreo.  Mix grey and white icing in the piping bag for fur (the instructor's pictured here did not have the two toned icing).  Use 1/2 of a Starburst for the tongue and shape it appropriately, with a small score for the bend in the tongue.

Yorkie

The Yorkie uses a mix of chocolate and vanilla icing in the piping bag.  Insert a large triangle of Oreo cookie as the forehead at an angle, with the plain side to the front.  You may need to cut a slit in the cupcake to insert the oreo.  Place a marshmallow in front of the Oreo to form the snout.  Use small pieces of Oreo to insert ears slightly in front of the large triangle of forehead.  Pipe a mustache over the marshmallow, then pipe the surrounding areas.  Use M&M candies for the eyes and nose.  Use 1/2 of a starburst for the tongue as you did with the other cupcakes.  Use the other piece of starburst to form a bow for the hair on the forehead.

For more cute Pupcake ideas, check out this article from Parents Magazine.

What kind of creative cupcake decorating ideas have you actually experimented with?  Where did you get the ideas?  What kind of icing works best for this type of decorating?  Have you ever tried to do puppies, and if so what breeds?  If you have any other breeds, please leave me a comment below.  I may put together a class to fund my dog's vet bills, so I could really use the suggestions!

October 7, 2012

Hesby House Garden Rebirth


After spending some time at my folks' in July and August, it was time to refresh my own backyard in earnest!  The old grass was a Kentucky Ryegrass that grew in tufty patches and never seemed to even out.  I hired a wonderful gardener who pulled all the old, dried weed and put in its place a seed called Marathon.  These pics were taken about a month ago, but I'm finally getting around to sharing.


The canna on the side was sternly trimmed.  Letting the light back into the bed opens it up nicely.


The English tea garden with my herbs list all its buds in the 108 degree temps we had this summer, but it's coming back with regular watering.  I re-planted sage, basil, and dill.


The hibiscus are slowly growing into the hedge I envisioned.  The buds here are returning with more watering, too.


I got a vine from a friend last fall, and it has rooted well!  I think this is called Passionfruit?  It's on the chain link fence separating my property from the apartment building next door.  The morning glories I've had there before get too aggressive and overgrown.  And I love these delicate flowers.


I overhauled my pots in the front with dollar store mums and finds from the half-dead pile at the hardware store.  The mums in my favorite golden hues will bring fall to Southern California, if they can survive the summer temperatures we had throughout September!

(The front walkway)


The last bit of whimsy is a new birdbath!  It sits in the ivy rounding the corner to my front door.

What are your favorite garden decorations?  Please share a comment or photo with me below!

October 5, 2012

Cast Resin Halloween Swag


My folks' new house called for some new holiday decorations.   A friend taught me how to use a pourable resin with fixative to mold some really cute holiday figures.  I used them to create a Holiday swag over the fireplace, bringing fall right into the heart of the great room.


Molded from shortbread cookie pans, the ornaments could have been made into magnets, windchimes, mobiles, or wreaths.  It was a fun way to experiment with a new craft.  


We played with glitter to give the resin different colors, even layering to create a look like the candy corn.  I used nail polish to add details like eyes on several pieces, and sprayed a clear gloss sealant for extra shine. Adding ribbon bows made with floral wire gives body that makes the decoration stand out from further across the room.


This little Mummy man had the added distinction of glowing in the dark.  It's the glitter that has the effect, not the resin, but he certainly stands out.


October 4, 2012

Teatime with Ms. Cheap


My mom and I went to a church ladies' guild meeting to hear a featured speaker, Ms. Cheap from the local Tennessean newspaper.  The theme for the refreshments at the meeting was teatime:  half the folks brought finger sandwiches, and half brought cookies.  

I wanted to bring something we could prep ahead, so I made a big bowl of egg salad the night before, and picked out a loaf of marbled wheat bread.  To spruce up my basic egg salad, I added a bit of ground mustard, ground nutmeg, and garlic powder to the cheddar cheese, egg whites, and mayo.  They were pretty and delish!

Ms. Cheap proved to be an entertaining speaker with a wealth of local tips on bargains, shopping, and  entertaining in my folks' new town.  Check out her blog for helpful info regardless of your location.

October 2, 2012

Halloween Eyeball Ice Cubes


A friend of mine is in a rental situation that includes several lovely fruit trees.  Her landlord recently wanted to make some repairs to her roof, which necessitated trimming the trees out of season for pruning.  Before the tree was stripped, my friend offered me a boatload of limes. 

Since I don't eat meat, I don't use them for sauces like you might use for fish or such.  So, my best thought was to juice the limes and freeze the juice for baking.  Luckily, I'd just gotten the juicer attachment for my KitchenAid Stand Mixer and was so excited to get to use it!  I did this over several days, and ended up with about 24 cups of juice.  I used ice cube trays for portion control, so I could thaw as much or as little as I might want to use.  As I was juicing, I had a thought--what if I put maraschino cherries in each hole, with frozen juice around it?  I thought it would make "fancy" ice cubes for drinking in something like ginger ale or in some sort of mixed drink. 


The timing couldn't have been better, because I think these cubes make great "eyeballs" for a Halloween party!  What kind of signature drink would you invent for the occasion?  Please leave a comment below to share your ideas.


September 27, 2012

Halloween Doughnut Cake with Cream Cheese Icing


I had a new cake pan to try out, so I thought I'd make this oversized Halloween doughnut as a thank you for a craft-loving friend who did a huge favor for me.  I made a basic spice cake from a mix to see how the pan would fill and brown.  

To make it a little special, I wanted to try a cream cheese icing from scratch, something I'd never done before.  The main reason for doing it homemade:  I wanted something a bit runnier than the can at the grocery store so it would resemble a doughnut glaze in the way it would lay down the sides of the cake.  I searched online and came up with an unusual recipe that utilized ricotta cheese.  It turned out supremely yummy!  I definitely want to bookmark this recipe so I decided to reprint it here.

I used some Wilton spray icing coloring to add a green glow, then layered graham cracker crumbs with Halloween pumpkin sprinkles.  I was really pleased with how festive it turned out! 

Cream Cheese Icing with Ricotta

2 tbsp softened butter
4 oz cream cheese softened
1/2 c ricotta cheese
1 tsp vanilla
2 c powdered sugar


What's your favorite recipe for icing?  Do you even measure out the ingredients precisely, or just pour until you reach a desired consistency?  Can you freeze leftover icing?  Please leave a comment below.

September 10, 2012

KCRW's Fourth Annual Good Food Pie Contest 2012


My entry to this year's KCRW's Good Food Pie Contest is a reprise, of sorts.   I had intended last year to have two entries, the first time I had been so ambitious.  My original idea was to make a pie from blackberries I'd grown in my own garden that summer.  But in keeping with my tradition of bringing favorite family recipes, I also wanted to bring my mom's Chocolate Marble Cheesecake, the dessert most requested on birthdays as I was growing up.  

I have very limited counter space in my small apartment kitchen, which mostly translates to my oven burners.  So I was overjoyed last year when a friend agreed to let me cook at her house for this competition.  I made both my pies there one evening, and the additional space to spread out left me room to experiment with a cheddar crust for my blackberry pie, while the cheesecake was in the oven.  The last step for this rather complicated dessert is to let it rest in the warm oven after baking, without opening the door to check its progress for fear of the heat escaping.  So I triumphantly turned the dial over on the cheesecake at the allotted time and took a glass of wine to my friend, promising I would soon be out of her hair.   What I didn't realize until the smell of caramelized sugars reached my nose some ten minutes later, was that I had turned the dial in the wrong direction, mistakenly landing it on broil!  That pie turned into a spooned pan of muck that I left as my thank you gift to my hostess ~ I can't believe my impunity as I was disappointed and mad at only mySELF.  Loving this recipe as I did, I decided to share it anyway, so it's been up on my blog in this post.  

There were a few major changes to this year's pie competition.  The most obvious was that they required two whole pies, one for the judges, and one for public tasting.  This meant that judges could base presentation on the look of a whole pie, when in past judging was based on only a single cut slice.  I found translating my springform dish into a standard pie pan was relatively simple--I doubled the crust, and made only a single batch of the filling, which split into two pies, perfectly fitting the requirement.  I've bought several stencils in the past, but never experimented with them.  This time I took my competition pie and tried to gently sift a bit of extra cocoa on top.  I did it before baking them, and didn't want my stencil to disturb the swirl of chocolate and vanilla flavoring, so I held the stencil a half inch or so from the surface.  That turned out to be too far away for a concrete edging, and I didn't like the look of it, so I used that pie for the public, saving the plain one for judging. 


Once again the event has grown.  This year it was held on the greenspace at LACMA, the LA County Museum of Art.  It was a lovely venue, but the pie tasting was offered to anyone who happened to be at the museum that day, so immediately demand exceeded supply.  To compensate, all "tasters" had to line up well in advance and receive two tickets, which were to be exchanged for only two samples.  With sampling limited, tasters became choosy, and the whole experience turned into a popularity contest.  I stood begging people to try my beautiful and yummy cheesecake, until finally I decided to forgo ticket exchanging so I could get on with it in hopes of being free to try a piece or two myself.  The whole thing was humbling rather than uplifting.  The event has gotten out of hand to the point where I'm not sure I'll be participating again.


The tastings were also spread around into multiple separate covered tents, arranged randomly according to arrival.  This helped with the crowd control, but made it impossible to get a scope of what was there, or to ever find someone you knew. 


 Review past years' Pie Contest blog entries here:

2011's Black Rose Pie
more 2011
2010's Peanut Butter Custard Pie with Apricot Glaze
2009's Grandma's Impossible Pie