Subscribe Via Email

Like reading this blog? You can get the complete text of the latest articles at Within My Means in your email inbox each morning by entering your email address below, then verifying the subscription. Your address will only be used for mailing you the blog, and each one will include a link so you can unsubscribe at any time.

Enter your email address:

Delivered by FeedBurner

October 7, 2012

Hesby House Garden Rebirth


After spending some time at my folks' in July and August, it was time to refresh my own backyard in earnest!  The old grass was a Kentucky Ryegrass that grew in tufty patches and never seemed to even out.  I hired a wonderful gardener who pulled all the old, dried weed and put in its place a seed called Marathon.  These pics were taken about a month ago, but I'm finally getting around to sharing.


The canna on the side was sternly trimmed.  Letting the light back into the bed opens it up nicely.


The English tea garden with my herbs list all its buds in the 108 degree temps we had this summer, but it's coming back with regular watering.  I re-planted sage, basil, and dill.


The hibiscus are slowly growing into the hedge I envisioned.  The buds here are returning with more watering, too.


I got a vine from a friend last fall, and it has rooted well!  I think this is called Passionfruit?  It's on the chain link fence separating my property from the apartment building next door.  The morning glories I've had there before get too aggressive and overgrown.  And I love these delicate flowers.


I overhauled my pots in the front with dollar store mums and finds from the half-dead pile at the hardware store.  The mums in my favorite golden hues will bring fall to Southern California, if they can survive the summer temperatures we had throughout September!

(The front walkway)


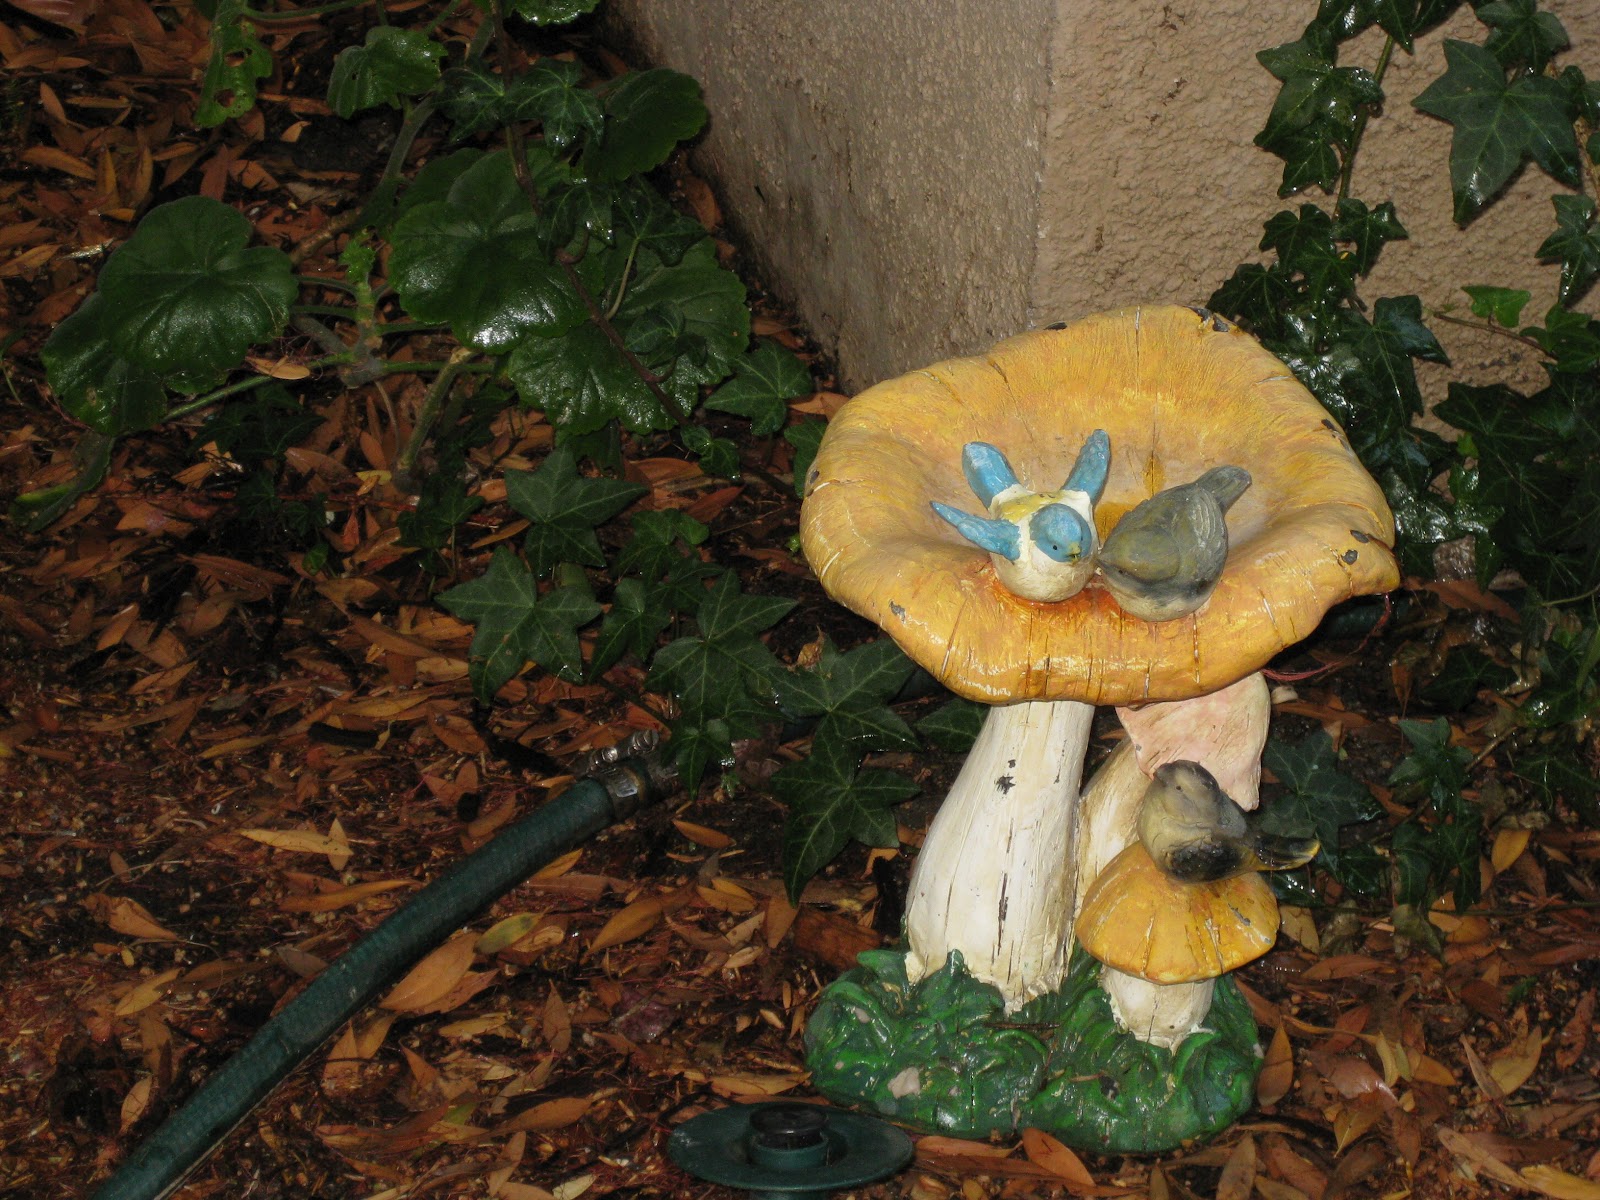
The last bit of whimsy is a new birdbath!  It sits in the ivy rounding the corner to my front door.

What are your favorite garden decorations?  Please share a comment or photo with me below!

October 5, 2012

Cast Resin Halloween Swag


My folks' new house called for some new holiday decorations.   A friend taught me how to use a pourable resin with fixative to mold some really cute holiday figures.  I used them to create a Holiday swag over the fireplace, bringing fall right into the heart of the great room.


Molded from shortbread cookie pans, the ornaments could have been made into magnets, windchimes, mobiles, or wreaths.  It was a fun way to experiment with a new craft.  


We played with glitter to give the resin different colors, even layering to create a look like the candy corn.  I used nail polish to add details like eyes on several pieces, and sprayed a clear gloss sealant for extra shine. Adding ribbon bows made with floral wire gives body that makes the decoration stand out from further across the room.


This little Mummy man had the added distinction of glowing in the dark.  It's the glitter that has the effect, not the resin, but he certainly stands out.


October 4, 2012

Teatime with Ms. Cheap


My mom and I went to a church ladies' guild meeting to hear a featured speaker, Ms. Cheap from the local Tennessean newspaper.  The theme for the refreshments at the meeting was teatime:  half the folks brought finger sandwiches, and half brought cookies.  

I wanted to bring something we could prep ahead, so I made a big bowl of egg salad the night before, and picked out a loaf of marbled wheat bread.  To spruce up my basic egg salad, I added a bit of ground mustard, ground nutmeg, and garlic powder to the cheddar cheese, egg whites, and mayo.  They were pretty and delish!

Ms. Cheap proved to be an entertaining speaker with a wealth of local tips on bargains, shopping, and  entertaining in my folks' new town.  Check out her blog for helpful info regardless of your location.

October 2, 2012

Halloween Eyeball Ice Cubes


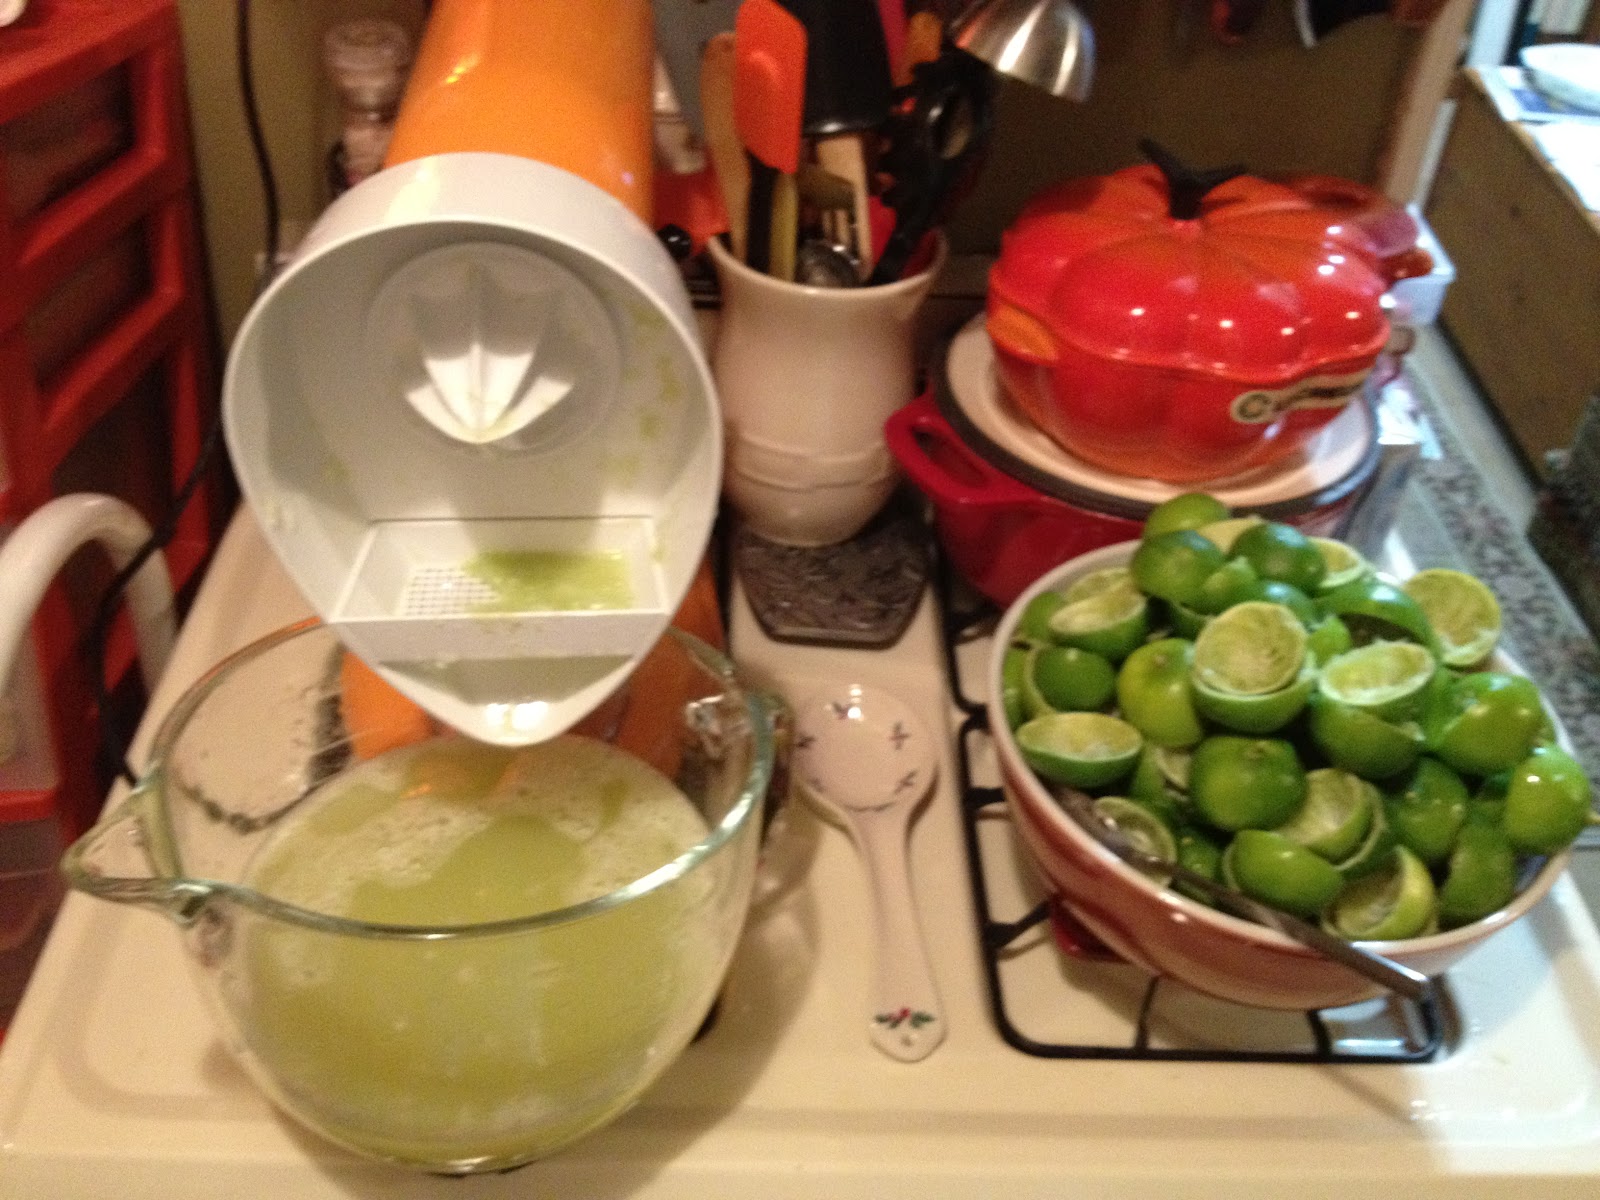
A friend of mine is in a rental situation that includes several lovely fruit trees.  Her landlord recently wanted to make some repairs to her roof, which necessitated trimming the trees out of season for pruning.  Before the tree was stripped, my friend offered me a boatload of limes. 

Since I don't eat meat, I don't use them for sauces like you might use for fish or such.  So, my best thought was to juice the limes and freeze the juice for baking.  Luckily, I'd just gotten the juicer attachment for my KitchenAid Stand Mixer and was so excited to get to use it!  I did this over several days, and ended up with about 24 cups of juice.  I used ice cube trays for portion control, so I could thaw as much or as little as I might want to use.  As I was juicing, I had a thought--what if I put maraschino cherries in each hole, with frozen juice around it?  I thought it would make "fancy" ice cubes for drinking in something like ginger ale or in some sort of mixed drink. 


The timing couldn't have been better, because I think these cubes make great "eyeballs" for a Halloween party!  What kind of signature drink would you invent for the occasion?  Please leave a comment below to share your ideas.


September 27, 2012

Halloween Doughnut Cake with Cream Cheese Icing


I had a new cake pan to try out, so I thought I'd make this oversized Halloween doughnut as a thank you for a craft-loving friend who did a huge favor for me.  I made a basic spice cake from a mix to see how the pan would fill and brown.  

To make it a little special, I wanted to try a cream cheese icing from scratch, something I'd never done before.  The main reason for doing it homemade:  I wanted something a bit runnier than the can at the grocery store so it would resemble a doughnut glaze in the way it would lay down the sides of the cake.  I searched online and came up with an unusual recipe that utilized ricotta cheese.  It turned out supremely yummy!  I definitely want to bookmark this recipe so I decided to reprint it here.

I used some Wilton spray icing coloring to add a green glow, then layered graham cracker crumbs with Halloween pumpkin sprinkles.  I was really pleased with how festive it turned out! 

Cream Cheese Icing with Ricotta

2 tbsp softened butter
4 oz cream cheese softened
1/2 c ricotta cheese
1 tsp vanilla
2 c powdered sugar


What's your favorite recipe for icing?  Do you even measure out the ingredients precisely, or just pour until you reach a desired consistency?  Can you freeze leftover icing?  Please leave a comment below.

September 10, 2012

KCRW's Fourth Annual Good Food Pie Contest 2012


My entry to this year's KCRW's Good Food Pie Contest is a reprise, of sorts.   I had intended last year to have two entries, the first time I had been so ambitious.  My original idea was to make a pie from blackberries I'd grown in my own garden that summer.  But in keeping with my tradition of bringing favorite family recipes, I also wanted to bring my mom's Chocolate Marble Cheesecake, the dessert most requested on birthdays as I was growing up.  

I have very limited counter space in my small apartment kitchen, which mostly translates to my oven burners.  So I was overjoyed last year when a friend agreed to let me cook at her house for this competition.  I made both my pies there one evening, and the additional space to spread out left me room to experiment with a cheddar crust for my blackberry pie, while the cheesecake was in the oven.  The last step for this rather complicated dessert is to let it rest in the warm oven after baking, without opening the door to check its progress for fear of the heat escaping.  So I triumphantly turned the dial over on the cheesecake at the allotted time and took a glass of wine to my friend, promising I would soon be out of her hair.   What I didn't realize until the smell of caramelized sugars reached my nose some ten minutes later, was that I had turned the dial in the wrong direction, mistakenly landing it on broil!  That pie turned into a spooned pan of muck that I left as my thank you gift to my hostess ~ I can't believe my impunity as I was disappointed and mad at only mySELF.  Loving this recipe as I did, I decided to share it anyway, so it's been up on my blog in this post.  

There were a few major changes to this year's pie competition.  The most obvious was that they required two whole pies, one for the judges, and one for public tasting.  This meant that judges could base presentation on the look of a whole pie, when in past judging was based on only a single cut slice.  I found translating my springform dish into a standard pie pan was relatively simple--I doubled the crust, and made only a single batch of the filling, which split into two pies, perfectly fitting the requirement.  I've bought several stencils in the past, but never experimented with them.  This time I took my competition pie and tried to gently sift a bit of extra cocoa on top.  I did it before baking them, and didn't want my stencil to disturb the swirl of chocolate and vanilla flavoring, so I held the stencil a half inch or so from the surface.  That turned out to be too far away for a concrete edging, and I didn't like the look of it, so I used that pie for the public, saving the plain one for judging. 


Once again the event has grown.  This year it was held on the greenspace at LACMA, the LA County Museum of Art.  It was a lovely venue, but the pie tasting was offered to anyone who happened to be at the museum that day, so immediately demand exceeded supply.  To compensate, all "tasters" had to line up well in advance and receive two tickets, which were to be exchanged for only two samples.  With sampling limited, tasters became choosy, and the whole experience turned into a popularity contest.  I stood begging people to try my beautiful and yummy cheesecake, until finally I decided to forgo ticket exchanging so I could get on with it in hopes of being free to try a piece or two myself.  The whole thing was humbling rather than uplifting.  The event has gotten out of hand to the point where I'm not sure I'll be participating again.


The tastings were also spread around into multiple separate covered tents, arranged randomly according to arrival.  This helped with the crowd control, but made it impossible to get a scope of what was there, or to ever find someone you knew. 


 Review past years' Pie Contest blog entries here:

2011's Black Rose Pie
more 2011
2010's Peanut Butter Custard Pie with Apricot Glaze
2009's Grandma's Impossible Pie

September 3, 2012

Teatime and Hat Decorating

I met a lovely group of exuberant women yesterday thanks to the Meetup group 4L.  Our host came up with a great theme for a party--hat decorating at teatime!  We had a potluck buffet of tea time baked goods and dainty sandwiches, with a mound of creative supplies laid out on the craft table, including felt, feathers, rhinestones, silk florals, and ribbons of all types to add to our own hats we'd brought to decorate.


What is the most creative themed party that you have attended or thrown?  Please leave a comment below--I can't wait to hear your stories!

August 19, 2012

Creative Nail Designs: Web Round-up


My web trolling has a new obsession:  nail designs.  I can never grow my nails long enough to accomodate much flashiness, but the designs that have caught my eye lately have spunk and personality.


You can have fun with holidays in simple ways that don't require much talent or control, like these awesome candy-corn halloween nails:


One of my favorite designs lately is this awesome breast cancer support ribbon.  Check out Cindy's site for some more fun ideas.
 

August 18, 2012

Magnetic Photo Puzzle

(Jane, John, Edna, & Rita)

My creativity lately has been focused on care packages, since my mom has been diagnosed with breast cancer and is currently facing radiation treatments.  Luckily she's expected to recover, but since I'm not near her, I've been trying to buoy her spirits with fun mail.  While I'm between shows, I have to be financially cautious, so I've been relying on groupon deals and other similar discount sites.  

Over the spring and summer I've sent my favorite teas, a quilt and bag in a breast cancer pattern, fun holiday stuff around July 4th, Omaha Steaks for my dad (the main caretaker), a cookie bouquet, some beading supplies (her current craft distraction) and a nice pearl necklace.

Today there's a deal for 50% off a magnetic photo puzzle.  I'm reprinting a picture of my mom with her living brothers and sisters that was taken at our family reunion this month.  It was the first reunion I was able to attend in about ten years!  I was so glad to see everyone.  Of 23 living first cousins (my generation), thirteen were in attendance. 

The KGB deal can be found here and the company, Heads Up Puzzles, has several options.  What other ideas for great care packages can you give me?

August 17, 2012

Baked Peach French Toast


I went through some cookbooks at  my Aunt Ann's, and while visiting my folks the one thing I got around to making was this Baked Peach French Toast.  The cream cheese in the recipe makes this dreamy deliciousness.  

The first few pictures are of the assembled casserole before baking.  As usual, I anticipated this so much that I forgot to take a picture before we dug in with gusto, so the only "after" photo I can offer is of the tiny corner which we couldn't touch once we had stuffed ourselves.

I made two 8x8 pans and froze one for later.  I doubled the sauce so each pan will be moist.  The recipe comes from the Carlinville Christmas Market 20th Anniversary Cookbook, 2009 in Carlinville, IL.


April 29, 2012

LABB Bake Sale / Salted Caramel Chocolate Bars


The LA Bread Bakers had a bake sale today to promote the passage of the Cottage Food Law.  I thought I would try something new in preparation for my own bake sale I'm planning for Sponsor Claire.  These Salted Caramel Chocolate Bars over at Kitchen Runway fit the bill.


Salted Caramel Chocolate Bars
(reprinted from Kitchen Runway)
Prep: 10 mins  Cooking time: 30 mins   Yields one 9 x 13 pan of rich goodness
Ingredients
1½ C All Purpose Flour
1½ C Quick Cooking Oats
1¼ C Light Brown Sugar
1 C Regular Butter, melted
½ tsp Cinnamon
1 tsp Baking Soda
1¼ C Semi-Sweet Chocolate Chips
1 19oz of Butterscotch Caramel topping (if you can’t find butterscotch topping – regular caramel topping is fine too.   I find the 16oz jar of caramel topping works well too (mixed with 5 Tbs. of flour).
6 Tbs Flour
¼ tsp Coarse Kosher Salt or Coarse Sea Salt
Directions
  • Preheat oven to 350º,  grease a 9×13 glass baking dish with cooking spray (make sure you get the sides too)
  • Combine flour, oats, sugar, butter, cinnamon and baking soda in a large mixing bowl
  • Press ½ of the flour and mixture into the baking dish, bake for 10 mins
  • Pour caramel topping into a medium size bowl and stir in the 6 Tbs. of flour
  • Pull baking dish from oven, sprinkle chocolate chips over warm crust, pour thicken caramel evenly over the chocolate chips (You can use an offset spatula to help spread the caramel)  Sprinkle the coarse salt over the caramel topping.
  • Crumble the rest of the crust mixture evenly over the caramel topping.  You can gently pat the crumbly crust – but do not press down.  Bake for an another 20 minutes.
  • Let cool completely and then cut into bars.  If you wish – you can sprinkle an additional tiny pinch of coarse salt on top of the crust before it cools completely.
  • Eat, indulge…and repeat!  Ahhhhhh bliss

March 30, 2012

Pysanky Egg Dying for Easter!


This Easter I had the good fortune to learn about a Ukrainian craft technique called Pysanky. The name comes from the verb to write, as you use a stylus (called a kistka) to write with wax on the egg shell.


The eggs are first blown out through holes at each end to be hollow, so they will last indefinitely.

You start with the lightest color, usually white. Everything that you want to remain white, you cover with wax, using the kistka. Then, you dye the egg, in the next dye bath, going in progressively darker colors, and add more wax. Wherever there is wax, the dye will not be able to penetrate. This preserves the part of the design under the wax. In the end, you will have an egg with a great deal of wax on it. Then, using the side of a candle flame, you melt away the wax, revealing the colors that were protected underneath. This results in a brilliantly colored and often very intricately designed egg!


The dyes used in Pysanky are also not your traditional pills-from-a-kit variety that one buys around the Easter holiday in America. These chemical dyes are super saturated, producing noticeably more vibrant colors than regular food dyes. Because the eggs are hollow, they floated atop the dye, unlike the hard-boiled ones I had traditionally been used to, so they had to be spun on the surface of the liquid dye to achieve a uniform look.


Below is an egg from our night that is mostly covered in beeswax, and is in the later stages of dying. The beeswax tended to turn dark from the flame as it melted in the kistka -- you can see that as well on my white egg above that I had just started decorating.


As the wax is melted off of the finished egg, it's absorbed by wiping with a paper towel. The designs are revealed as if cleaning a mirror It's breathtaking to realize the final look.


Our hostess Yvonne created a lovely graphic tonal egg in blues and black that was stunning.


Here's a link to the Meetup event that I attended: http://www.meetup.com/Etsy-Mob/events/55761302/

It was my first time joining the "Etsy Mob" and the people that were there were warm and welcoming artists and teachers. I look forward to getting together with them in the future!

If you'd like to learn more about Pysanky, check out this site with instructions, sources for materials, and patterns: http://learnpysanky.com/

What are some of your favorite Easter traditions, and what are their origins? Please share by leaving a comment on my blog.

March 2, 2012

Grandma Walker's Potato Chip Cookies


Grandma Walker's potato chip cookies are in the oven! I remember her making them for us when we'd visit but this is the first time I've tried them. She always made drop cookies--I'm experimenting with the dough as a bar cookie since I have neither the counter space nor the sink/dishwasher for cookie sheets. I so hope they turn out well as I've been looking forward to them for weeks!

I'm gonna try one or two and mail at least half the pan to my mom, since this was her mother's recipe. Another reason to make them as a bar cookie--they'll fit better in a mailing box. I used sliced almonds because I had them left over from holiday baking, but any nut will do in this recipe. My grandma would've used chopped walnuts. This is one recipe where the quality and freshness of your flour really makes a difference. I only keep one kind of flour in my home--no room for lots of containers--so pretty much everything I make is made with wheat flour. Since I don't cook for a large number of people, I'm learning to scale down my baking supplies and buy smaller quantities more often. Stale flour is no good (though that wasn't my issue today). I had trouble having patience before sampling them straight out of the oven, so they were a little crumbly when cut. After putting them in the fridge to cool, they hardened up and cut quite nicely.

My friends might not know my grandma raised nine children, for long spans of time as a single parent. I love revisiting her depression-era recipes. This typed version was scanned from a cookbook put together at the retirement complex my grandma lived in for years--Round Barn Manor in Champaign IL in the early 1980s.

Potato Chip Cookies

3/4 c. Butter
1/2 c. Sugar
1 Egg Yolk
1 1/2 c. sifted Flour
1/2 c. Nuts
3/4 c. crushed Chips

Mix all together and drop on ungreased cookie sheet. Bake at 350 degrees for 12/15 minutes. Cool 1 minute and sprinkle with powdered sugar.